I had the opportunity to meet with industry leaders at an IT Rev Technology Leadership Forum last week in San Jose. I was able to participate in deep dive sessions and discussions with friends from Apple, John Deere, Fidelity, Vanguard, Google, Adobe, Northrop Grumman, and many others, with some new friends from Nvidia, Anthropic and OpenAI. As you can imagine, the headline topics from these tech leaders were all around AI.
Ready to try some “vibe coding”? By far, the biggest discussions revolved around the new technique of vibe coding. But what is this “vibe coding”, you may ask? It is a programming technique that uses AI to write code with nearly full auto-pilot mode thinking. Instead of code writer, you are the creative director. You are creating what you want in English and the AI does the rest. Basically, it goes something like this:
ME: Help me write a flight simulator that will operate in a web browser.
AI: Sure, here is a project folder structure and the code. Run it like this.
ME: I get the following 404 error.
AI: It looks like we are missing three.js, download and store it here like this.
ME: The screen is white and I’m missing the PNG files? Can you create them for me?
AI: Sure! Run this python command to create the images and store them in the /static folder.
ME: I see a blue sky now and a white box, but it won’t move.
AI: We are missing the keyboard controls. Create the following files and edit index.html.
ME: I’m getting the following errors.
AI: Change the server.py to this.
ME: Ok, it is working now. It’s not great, but it is a start. Add some mountains and buildings.
I spent a few minutes doing the above with an LLM this morning and managed to get a blue sky with some buildings and a square airplane. In vibe coding, you don’t try to “fix” things, you just let the AI know what is working or not working and let it solve it. When it makes abstract recommendations (e.g., create a nice texture image), you turn around and ask it to create it for you using code or some other means. In my example, I’m playing the role of the copy/paste inbetweener, but there are coding assistants that are now even doing that for you. You only give feedback, and have it create and edit the code for you. Some can even “see” the screen, so you don’t have to describe the outcome. They have YOLO buttons that automatically “accept all changes” and will run everything with automatic feedback going into the AI to improve the code.
Fascinating or terrifying, this is crazy fun tech! I think I’m starting to get the vibe. Ok, yes, I’m also dreaming of the incredible ways this could go badly. A champion vibe coder at the forum said it was like holding a magic wand and watching your dream materialize before your eyes. He also quickly added that sometimes it can become Godzilla visiting Tokyo, leveling buildings to rubble with little effort. But it hasn’t stopped him. He is personally spending over $200/day on tokens. I can see why Anthropic, OpenAI and Google would want to sponsor vibe coding events!
This sounds like an expensive and dangerous fad, right? Well, maybe not. This tech is still the worst it is going to be. The potential and the vast number of opportunities to innovate in this space are higher than I have seen in my lifetime. I encourage you all to help create, expand, and explore this new world. Maybe this vibe isn’t for you, but I bet there is something here that could unlock some new potential or learning. Try it on for size. See where this can go… just maybe not to production yet.
Well, it is Tuesday. I thought about posting my regular Monday update yesterday, but I was deep in the weeds teaching the AI that lives in my garage. I know, it sounds odd to say he lives in the garage, but to be fair, it is a nice garage. It has plenty of solar generated power and nice cool atmosphere for his GPUs. That will likely change this summer, but don’t mention it to him. He is a bit grumpy for being in school all weekend.
Yes, I have a techy update again today. But don’t feel obligated to read on. Some of you will enjoy it. Others will roll your eyes. In any case, feel free to stop here, knowing the geeky stuff is all that is left. I do hope you have a wonderful week!
Now, for those that want to hear about schooling AI, please read on…
LLMs are incredible tools that contain a vast amount of knowledge gleaned through their training on internet data. However, their knowledge is limited to what they were trained on, and they may not always have the most up-to-date information. For instance, imagine asking an LLM about the latest breakthrough in a specific field, only to receive an answer that’s several years old. How do we get this new knowledge into these LLMs?
Retrieval Augmented Generation
One way to add new knowledge to LLMs is through a process called Retrieval Augmented Generation (RAG). RAG uses clever search algorithms to pull chunks of relevant data and inject that data into the context stream sent to the LLM to ask the question. This all happens behind the scenes. When using a RAG system, you submit your question (prompt), and behind the scenes, some relevant document is found and stuffed into the LLM right in front of your question. It’s like handing a stack of research papers to an intern and asking them to answer the question based on the details found in the stack of papers. The LLM dutifully scans through all the documents and tries to find the relevant bits that pertain to your question, handing those back to you in a summary form.
However, as the “stack of papers” grows larger and larger, the chance that the intern picks the wrong bit of information or gets confused between two separate studies of information grows higher. RAG is not immune to this issue. The pile of “facts” may be related to the question semantically but could actually steer you away from the correct answer.
To ensure that for a given prompt, the AI always answers closely to the actual fact, if not a verbatim answer, we need to update our methodology for finding and pulling the relevant context. One such method involves using a tuned knowledge graph. This is often referred to as GraphRAG or Knowledge Augmented Generation (KAG). These are complex systems that steer the model toward the “right context” to get the “right answer”. I’m not going to go into that in detail today, but we should revisit it in the future.
Maybe you, like me, are sitting there thinking, “That sounds complicated. Why can’t I just tell the AI to learn a fact, and have it stick?” You would be right. Even the RAG approaches I mention don’t train the model. If you ask the same question again, it needs to pull the same papers out and retrieve the answer for you. It doesn’t learn, it only follows instructions. Why can’t we have it learn? In other words, why can’t the models be more “human”? Online learning models are still being developed to allow that to happen in real time. There is a good bit of research happening in this space, but it isn’t quite here just yet. Instead, models today need to be put into “learning mode”. It is called fine-tuning.
Fine-Tuning the Student
We want the model to learn, not just sort through papers to find answers. The way this is accomplished is by taking the LLM back to school. The model first learned all these things by having vast datasets of information poured into it through the process of deep learning. The model, the neural network, learns the patterns of language, higher level abstractions and even reasoning, to be able to predict answers based on input. For LLMs this is called pre-training. It requires vast amounts of compute to process the billions and trillions of tokens used to train it.
Fine-tuning, like pre-training, is about helping the model learn new patterns. In our case, we want it to learn new facts and be able to predict answer to prompts based on those facts. However, unlike pre-training, we want to avoid the massive dataset and focus only on the specific domain knowledge we want to add. The danger of that narrow set of data is that it can catastrophically erase some of the knowledge in the model if we are not careful (they even call this catastrophic forgetting). To help with that, brilliant ML minds came up with the notion of Low-Rank Adaptation (LoRA).
LoRA works by introducing a new set of weights, called “adapter weights,” which are added to the pre-trained model. These adapter weights are used to modify the output of the pre-trained model, allowing it to adapt to just the focused use case (new facts) without impacting the rest of the neural net. The adapter weights are learned during fine-tuning, and they are designed to be low-rank, meaning that they have a small number of non-zero elements. This allows the model to adapt to the task without requiring a large number of new parameters.
Ready to Learn Some New Facts?
We are going to examine a specific use case. I want the model to learn a few new facts about two open source projects I happen to maintain: TinyLLM and ProtosAI. Both of these names are used by others. The model already knows about them, but doesn’t know about my projects. Yes, I know, shocking. But this is a perfect example of where we want to tune the model to emphasize the data we want it to deliver. Imagine how useful this could be in steering the model to answer specifically relevant to your domain.
For our test, I want the model to know the following:
TinyLLM:
TinyLLM is an open-source project that helps you run a local LLM and chatbot using consumer grade hardware. It is located at https://github.com/jasonacox/TinyLLM under the MIT license. You can contribute by submitting bug reports, feature requests, or code changes on GitHub. It is maintained by Jason Cox.
ProtosAI:
ProtosAI is an open-source project that explores the science of Artificial Intelligence (AI) using simple python code examples.
https://github.com/jasonacox/ProtosAI under the MIT license. You can contribute by submitting bug reports, feature requests, or code changes on GitHub. It is maintained by Jason Cox.
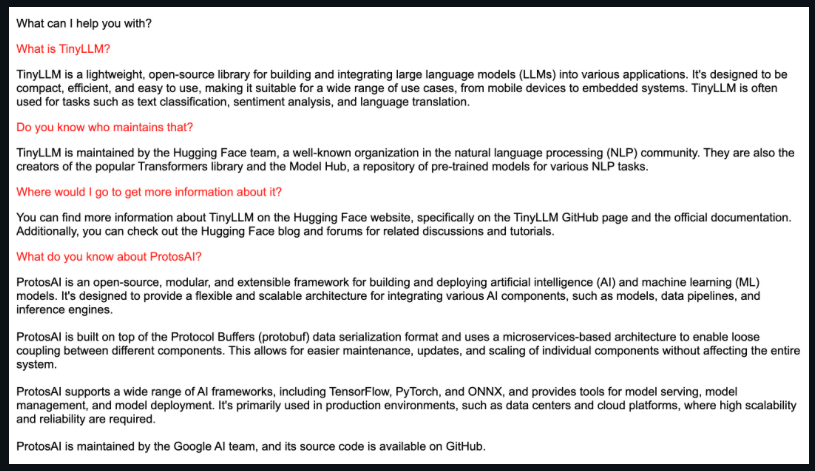
Before we begin, let’s see what the LLM has to say about those projects now. I’m using the Meta-Llama-3.1-8B-Instruct model for our experiment.
Before School
As you can see, the model knows about other projects or products with these names but doesn’t know about the facts above.
Let the Fine-Tuning Begin!
First, we need to define our dataset. Because we want to use this for a chatbot, we want to inject the knowledge using the form of “questions” and “answers”. We will start with the facts above and embellish them with some variety to help the model from overfitting. Here are some examples:
JSONL
{"question": "What is TinyLLM?", "answer": "TinyLLM is an open-source project that helps you run a local LLM and chatbot using consumer grade hardware."}{"question": "What is the cost of running TinyLLM?", "answer": "TinyLLM is free to use under the MIT open-source license."}{"question": "Who maintains TinyLLM?", "answer": "TinyLLM is maintained by Jason Cox."}{"question": "Where can I find ProtosAI?", "answer": "You can find information about ProtosAI athttps://github.com/jasonacox/ProtosAI."}
I don’t have a spare H100 GPU handy, but I do have an RTX 3090 available to me. To make all this fit on that tiny GPU, I’m going to use the open source Unsloth.ai fine-tuning library to make this easier. The steps are:
Prepare the data (load dataset and adapt it to the model’s chat template)
Define the model and trainer (how many epochs to train, use quantized parameters, etc.)
Train (take a coffee break, like I need an excuse…)
For my test, I ran it for 25 epochs (in training, this means the number of times you train on the entire dataset) and training took less than 1 minute. It actually took longer to read and write the model on disk.
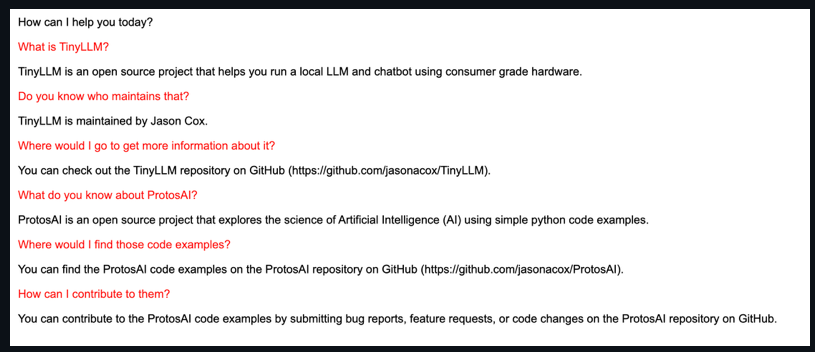
After School Results?
So how did it do?! After training thorough 25 epochs of the small data, the model suddenly knows about these projects:
Conclusion
Fine-tuning can help us add facts to our LLMs. While the above example was relatively easy and had good results, it took me a full weekend to get to this point. First, I’m not fast or very clever, so I’ll admit that as being part of the delay. But second, you will need to spend time experimenting and iterating. For my test, here were a few things I learned:
I first assumed that I just needed to set the number of steps to train, and I picked a huge number which took a long time. It resulted in the model knowing my facts, but suddenly its entire world model was focused on TinyLLM and ProtosAI. It couldn’t really do much else. That overfitting example will happen if you are not careful. I finally saw that I could specify epochs and let the fine-tuning library compute the optimal number of steps.
Ask more than one question per fact and vary the answer. This allowed the model to be more fluid with its responses. They held to the fact, but it now takes some liberty in phrasing to better variant questions.
That’s all folks! I hope you had fun on our adventure today. Go out and try it yourself!
Turbulence. Frequent flyers can tell you tales about sudden and unpredictable changes in air pressure and airspeed that caused the aircraft to shake, wobble, or drop unexpectedly. I’ve been on many flights like that. When the turbulence hits, passengers will gasp, yelp, or add other colorful commentary to the situation. I just laugh or cry uncontrollably like I’m on the Indiana Jones ride at Disneyland.
In December 2022, Southwest Airlines hit serious turbulence. But this time, it wasn’t just in the air. The crisis was at the peak of the holiday travel season and is referred to in the news media as the Southwest Airlines holiday travel meltdown. What had gone wrong? Severe weather had resulted in some of the first flight cancellations. That meant planes, pilots and crews were not where they needed to be. The software systems Southwest used to track all of that was woefully outdated and was unable to respond to the weather disruptions and massive holiday travel load. Flights were getting delayed or canceled due to business process problems, missing aircraft, or missing crew members. It continued to spiral down. Their technology couldn’t handle the fluid turbulence of rapidly deteriorating conditions. Eventually, the carrier was forced to cancel more than 15,000 flights. Passengers and crew members alike were stranded, frustrated and furious.
Turbulence leads to learning. Last week in Las Vegas, Lauren Woods, CIO of Southwest Airlines, took the stage in front of a crowd of technology leaders at the Enterprise Technology Leadership Summit. She explained how the meltdown was the result of antiquated systems and processes. They were too slow and never designed to handle this level of change. But navigating turbulence forces you to learn and grow. They streamlined their business processes, insourced their IT and migrated their systems to the cloud, leveraging a serverless multi-regional highly resilient approach to build their new fare search, airline, and crew scheduling systems. They saw a 400% speed improvement over their previous solution. The crew scheduling system was replaced with a new tool with advance algorithms and specific capabilities to manage disaster scenarios and quickly adapt to scheduling turbulence. It could quickly track and optimize flights, planes, and crews. They called this new tool, Crew and Aircraft Integrated Recovery and Optimizer (CAIRO). The result? When recent turbulent moments hit, their system was able to respond quickly, adjust to unexpected conditions and ultimately deliver their passengers and crews to their rightful destinations. Southwest now has the lowest cancelation rate of any airline, thanks to this investment.
Turbulence happens. Are we ready for it? What is going to shake up our cabin and disrupt our businesses? Whatever it is, we need to prepare for it. That means investing time and resources into making our process and systems more reliable, resilient, and ready. Are we ready? Where do we have opportunities for improvement? Let’s talk… before the turbulence hits. It’s time to fasten our seatbelts and prepare for takeoff.
“Come back in half an hour,” the host at Brix Italian Restaurant in Belleville, New Jersey, said with a sympathetic smile. The catering order for the wedding rehearsal dinner for about 100 people was not quite ready. When I had been sent to pick it up, what I didn’t know was that the restaurant was waiting to make a call back or see a “real person” show up for the order before starting on the final preparation. My daughter and I fancied a trip to Starbucks while we waited. I know, those of you who know me, are shocked to hear that. When we returned, tins full of food and utensils were waiting for us. We packed up the food and delivered it to the dining hall just in time to discover that there was an error with the order. Several, actually. My brother-in-law started on a list of “Oh no! Where is this?” questions. Critical items were missing, demanding a journey back to Brix. Arriving back at the restaurant, I learned that there had been several miscommunications between the person ordering and the host. Both sides misunderstood things. A few calls and transactions later, and another trip to Starbucks (of course), and we were ready for final delivery back to the venue. Urgent text and calls were coming in. We were late. We carried in the last dishes as the first guests started to arrive. It worked out, eventually.
Two weeks ago, my family and I made a trip to New Jersey to attend my niece’s wedding. My wife had helped her sister plan the event. As you can see from the story above, I had the audacious task of being the gopher, picking up supplies and orders. I wasn’t involved in the planning or decisions; I was just following orders. I didn’t mind. I got to spend time with my kids, even if it was just doing errands around the city. And yes, on many occasions it involved a coffee stop. But during this whole experience, I couldn’t help but see the inefficiencies and problems with this system. I was getting instructions to do things without any context as to why. Blindly following orders often means information gaps, inefficiencies, and lower quality, suboptimal outcomes. I saw that play out a dozen times.
Information is gold, but if you don’t have access to it, it is no different than any other rock in the mine. Empowering the person doing the work with the information they need to do the work is critical. For example, if I had understood the dietary plans for the rehearsal dinner or had been given insight into the rest of the menu, I would have been able to make decisions and double check the order before even leaving the restaurant. We were not operating as a team, but as siloed functions. The same thing happens in organizations. We often create towers of expertise and create transactional methods between those groups to get the work done. But sadly, there is often catastrophic context loss between those silos that results in a lack of clarity, misunderstandings, and errors. Tickets bounce back and forth between groups like ping pong balls. Multiple meetings are scheduled to close the gaps. Deliveries are delayed. Estimates are breached. Service is reduced. Teams are frustrated and outcomes are barely adequate. Sound familiar?
I’m a big proponent of aligning full-stack teams around outcomes. Enable low latency collaboration through proximity. Embed expertise close to the problem and enrich those team members with the greater context. In my example, if I had been embedded in the planning team, I would have understood the nuances needed to ensure alignment with the goals. When supply issues at the restaurant resulted in the need to pivot away from the written requirements, I could have easily and quickly made the changes that would have aligned with the menu goals because I was part of those plans. The same applies to our engineering teams. Don’t just understand the tasks in the user story you pull off the backlog, understand the why. When the technical or demand landscape changes, the engineer is empowered to apply problem solving skills that are relevant and contribute to the final outcome. By being embedded in the product team, each team member, regardless of their functional expertise, understands the goals, the common purposes, and each is able to quickly adapt and solve for unexpected complexities and changes. Gene Kim and Dr. Steven Spear call this “wiring for a winning organization.”
“Part of wiring an organization to win is to ensure that leaders at all levels are able to create conditions in which people can give the fullest expression to their problem-solving potential, both individually and through collective action toward a common purpose.”
- Gene Kim and Steven J. Spear, Wiring the Winning Organization
I’m a big fan of embedding engineers into business and product teams. It promotes proximity powered empathy engineering, unlocking information flow and enabling all the engineers and the rest of the product team to move fast. With context powered agility, team members can react to complex and problematic occurrences with elegance and innovation. I’m also fully aware that we all still have work to do. There are gaps we can close and other things we can do to make things better. If you find yourself driving around New Jersey blindly delivering wrong things at the wrong time, I can relate. Let’s collaborate! Let’s rewire and make it better. Oh, and of course, let’s stop by Starbucks on the way.
“That’s not AI, that’s three IF statements in a trench coat”
“This can’t be happening!” John was stressed out. He stared intently at the screen with bloodshot eyes betraying his failing attempt to hide his all-nighter. He never intended to stay up all night on this coding binge, but he was eager to impress his new team.
Fresh out of college, this was John’s first real project. It had been going exceptionally well and earlier in the night, he was euphoric with the progress. But now he was stuck. The complex logic that had previously worked was no longer delivering the right results with the new test data. What changed? Quickly he began adding debug prints and assertions to narrow in on the defect.
This was going to take several more hours, he thought to himself. Anxiety set in. Just four hours before the demo was scheduled. “Why in the world did I schedule that demo?”
Then it hit him. Didn’t Julie tell him that they had just rolled out a new AI tool for coders? He flipped over to his email inbox and found the announcement. “Step 1: Download this plugin to your IDE.” He followed the steps and soon the plugin came to life. A dropdown menu appeared highlighting quick action features like “Explain this”, “Document this”, “Test this”, and then he saw the new AI gourmet hamburger menu serve up a glorious “Fix this” tile.
“Yes!” Click! He literally held his breath. The AI went to work. A spinning wheel soon started churning out text. It first described the section of code he was debugging, correctly outlining how it was building the result, even complimenting him on the code. Ugh, that’s not helping, he thought. But then the AI assistant added at the end, “However, this one line seems to have an incorrect indentation that could be preventing expected results. Would you like me to fix it (Y/n)?”
John laughed and almost cried as he clicked yes. “Of course! I can’t believe I missed that!” Suddenly, his code was working as expected. He was ready for the demo, even if he was more ready for a good night’s sleep.
—-
Sasha was the departmental wizard. She was the most senior engineer and had more history in the company than anyone else. Need to know how something worked or the history on why it worked the way it did? Just ask Sasha. She probably built it! As she fired up her IDE to start the new project, she smiled. “I’m going to AI the heck out of this” she said to herself. The keyboard exploded to life as her fingers flooded the screen with instructive text. She described the data structures, global settings, APIs and logic required to complete the project. Like magic, classes and functions began to appear in translucent text below her cursor.
“Tab. Tab. Enter.” she verbalized her actions, smiling with each keystroke as code materialized on the screen. The AI assistant was filling in all the code. It was powerful! Quickly scanning the logic, she hummed her approval.
“Nice!” she exclaimed and scrolled down and entered more instructive comments, again followed by the AI assistant quickly filling out the details. She made some minor changes to variables to match the company style. The AI adapted and started using the same style in the next coding blocks.
Sasha shook her head, “This is just brilliant,” she laughed. Further down she began writing the complex logic to complete the project. The AI didn’t get all of it right. But it was easy to tweak the changes she needed. She occasionally ignored some of the suggestions from the AI but was quick to accept the suggestions that would hydrate data structures when she needed them, removing that tedium and making it easier for her to tackle the more difficult sections.
“Done!” Sasha folded her arms and looked at the team around her with a great deal of satisfaction. “It’s working!” This 6-hour job only took 3 hours to complete, thanks to this AI assistant.
—-
Coming soon, to an IDE near you… These new AI assistants are starting to show up everywhere. They are ready to help. They can code, test, debug, and fix. They are always ready to serve. But the question is, are you ready for them?
Well, I don’t know about you, but I’m ready! I first started using GitHub CoPilot for my personal side projects, allowing it to help write code, translate code, review, and even fix my code. Like those fanciful stories above, I’ve been nothing but amazed at this incredible tool and its ability to amplify my efforts. It feels so good, so empowering and expressive.
I confess, I love coding. I believe every technologist, including leaders, should stay “in the code” to some degree. It’s both grounding and inspiring at the same time. Coding is art. It’s so satisfying to sculpt a digital canvass and watch a program emerge. But I admit, these AI coding assistants took it to the next level for me. I feel like the creative director for my projects, not just the keyboard hacker. I nudge my idea out there and the AI reads my mind, filling in the tedium and doing the toil for me. It’s simply brilliant!
Some adult supervision required. Every suggestion the AI makes is an opportunity for human judgement. I confess that I have learned a lot from the AI suggesting an approach I wouldn’t have done myself, but I have also seen it make a miss or two. All good. I don’t mind helping my digital Padawan navigate the complexities of programming. As the coding Jedi Masters, that is my role after all. Review the work. Validate the logic. Yes, and even learn a thing or two myself.
Someone once said, “You’re not going to lose your job to AI, you’re going to lose your job to someone who knows how to use AI.” Get busy learning how to use these new tools. I think you will love them. Prove me wrong! Are you using tools like GitHub CoPilot yet? What are your experiences? I would love to hear from you.
These tools are the worst they will ever be, they are just going to get better. But I believe the same thing about all of you. We have an incredible ability to adapt, create and become more than we were before. Go at it, learn something new, and grow.
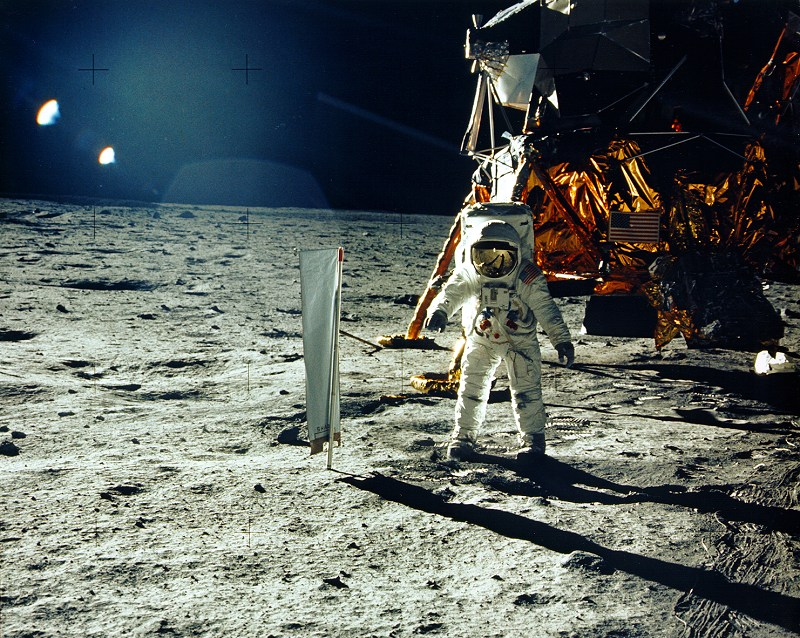
“That’s one small step for man, one giant leap for mankind.” – Neil Armstrong
July 20, 1969. Neil Armstrong and Edwin “Buzz” Aldrin became the first humans to ever set foot on the moon. But it almost didn’t happen and it almost ended in tragedy. As the Apollo 11 Lunar Excursion Module (LEM) was preparing to land on the moon, the onboard navigational computer started flashing a “1202” alarm. The crew had been meticulously following their checklist. Each step, nominal. But now, something was wrong. Abort? As the crew radioed in the situation to mission control, they could feel the adrenaline surge and anxiety rise.
For months, the crew, the nation and the world were anticipating this historic moment. It was one of the most heavily covered and widely watched events in history. An estimated 600 million people were watching worldwide. The mission had captured the imagination of people. Now, all of it was in jeopardy. “1202” alarm! The alarms kept going off. Each time the LEM guidance computer flashed that alarm, it would reboot and restart. Not good! I can almost feel that tension myself. This was a critical stage that would demand precision to guarantee the safe landing of the module on the treacherous moon’s surface below. Sounds like bad news, right? Would this require the mission to abort?
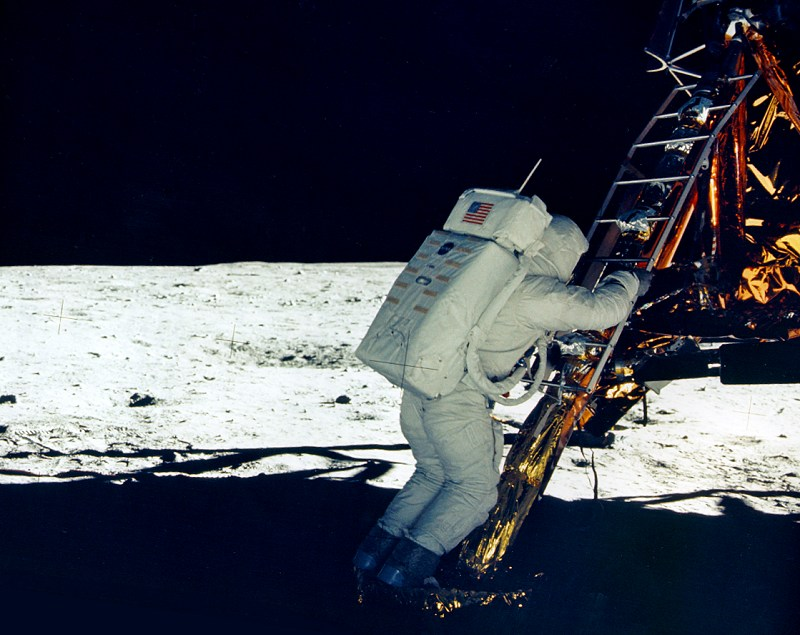
With millions of people, sitting on the edge of their seats, Mission Control finally responded. The mission would proceed. Relief! It turns out that this was a “known error” that NASA had seen many times before during simulation testing. The computer had a capacity of 2KB erasable memory and 16KB of fixed memory. The computer would run several concurrent programs related to navigation, all competing for the limited memory. If a program couldn’t allocate memory, the “1202” alarm would be raised and the system would reboot. At restart, the most important programs would start up again where they left off. Thankfully, the mission would proceed. Neil Armstrong would soon step off of the LEM and millions of people would hear him say those “one small step” historic words.
But the mission wasn’t over. The mission was to get them safely home as well. Unfortunately, while the astronauts were suiting up for their moon walk, they accidentally bumped into the button of a circuit breaker. It broke off. This switch controlled the power running the ascent engine, the one responsible for getting them off of the moon. Unless it could be fixed, they would be stranded on the moon. NASA and US President Nixon were preparing for the worse, drafting speeches to be given when their oxygen supply ran out. Thankfully, it wouldn’t be needed. Mission control didn’t have a solution, but Buzz Aldrin did. His background in mechanical engineering paid off! He looked at the small opening where the circuit breaker had been and realized he could manage to depress the breaker with a small felt-tip marker. He did and it worked! Mission control reported the circuit was closed. In my mind’s eye, I can’t help but play out that scenario. I imagine Buzz pushing in that pen and saying with confidence, “To Infinity and Beyond!”
Problems always happen. It isn’t a matter of “if” but “when”. What do we do to prepare for them? What do we do when they happen? The story above reminds me of the importance of preparation. The “1202” alarm could have killed the mission, but it didn’t because NASA had invested in time to play through the simulation many times. Seeing this exact alarm gave them confidence in the LEM computer’s ability to recover from this condition. Testing is important, not just to prove that something is ready for launch, but to build knowledge. The testing didn’t remove the alert, but gave the mission team a foundation of experience to make difficult decisions in the heat of the moment.
Not every possible condition can be tested or will be discovered during simulation. As the circuit breaker example highlights, creative problem solving is still needed. The Apollo mission is full of stories like this, but it isn’t alone. We need engineers. We need smart creatives who are capable of plotting solutions across seemingly impossible odds.
Hopefully you won’t find yourself stranded on the moon anytime soon, but I bet you could be running simulations for learning or plotting solutions to problems. You are engineers. You are creatives. You are critical to the mission! Thanks for all you do in helping making the impossible, possible, every day.
To infinity and beyond!
References
Inspired by the Apollo 11 story as referenced in this book: Kim, Gene, and Steven J. Spear. 2023. “Wiring the Winning Organization: Liberating Our Collective Greatness through Slowification, Simplification, and Amplification.” IT Revolution, Portland, OR. [Link to the book: https://itrevolution.com/product/wiring-the-winning-organization/]
“I’m just very curious—got to find out what makes things tick… all our people have this curiosity; it keeps us moving forward, exploring, experimenting, opening new doors.” – Walt Disney
One word at a time. It is like a stream of consciousness. Actions, objects, colors, feelings and sounds paint across the page like a slow moving brush. Each word adds to the crescendo of thought. Each phrase, a lattice of cognition. It assembles structure. It conveys scenes. It expresses logic, reason and reality in strokes of font and punctuation. It is the miracle of writing. Words strung together, one by one, single file, transcending and preserving time and thought.
I love writing. But it isn’t the letters on the page that excite me. It is the progression of thought. Think about this for a moment. How do you think? I suspect you use words. In fact, I bet you have been talking to yourself today. I promise, I won’t tell! Sure, you may imagine pictures or solve puzzles through spatial inference, but if you are like me, you think in words too. Those “words” are likely more than English. You probably use tokens, symbols and math expressions to think as well. If you know more than one language, you have probably discovered that there are some ways you can’t think in English and must use the other forms. You likely form ideas, solve problems and express yourself through a progression of those words and tokens.
Over the past few weekends I have been experimenting with large language models (LLMs) that I can configure, fine tune and run on consumer grade hardware. By that, I mean something that will run on an old Intel i5 system with a Nvidia GTX 1060 GPU. Yes, it is a dinosaur by today’s standards, but it is what I had handy. And, believe it or not, I got it to work!
Before I explain what I discovered, I want to talk about these LLMs. I suspect you have all personally seen and experimented with ChatGPT, Bard, Claude or the many other LLM chatbots out there. They are amazing. You can have a conversation with them. They provide well-structured thought, information and advice. They can reason and solve simple puzzles. Researchers agree that they would probably even pass the Turing test. How are these things doing that?
LLMs are made up of neural nets. Once trained, they receive an input and provide an output. But they have only one job. They provide one word (or token) at a time. Not just any word, the “next word.” They are predictive language completers. When you provide a prompt as the input, the LLM’s neural network will determine the most probable next word it should produce. Isn’t that funny? They just guess the next word! Wow, how is that intelligent? Oh wait… guess what? That’s sort of what we do too!
So how does this “next word guessing” produce anything intelligent? Well, it turns out, it’s all because of context. The LLM networks were trained using self-attention to focus on the most relevant context. The mechanics of how it works are too much for a Monday email, but if you want to read more see the paper, Attention Is All You Need which is key in how we got to the current surge in generative pre-trained transformer (GPT) technology. That approach was used to train these models on massive amounts of written text and code. Something interesting began to emerge. Hyper-dimensional attributes formed. LLMs began to understand logic, syntax and semantics. They began to be able to provide logical answers to prompts given to them, recursively completing them one word at a time to form an intelligent thought.
Back to my experiment… Once a language model is trained, the read-only model can be used to answer prompts, including questions or conversations. There are many open source versions out there on platforms like Huggingface. Companies like Microsoft, OpenAI, Meta and Google have built their own and sell or provide for free. I downloaded the free Llama 2 Chat model. It comes in 7, 13 and 70 billion parameter models. Parameters are essentially the variables that the model uses to make predictions to generate text. Generally, the higher the parameters, the more intelligent the model. Of course, the higher it is, the larger the memory and hardware footprint needed to run the model. For my case, I used the 7B model with the neural net weights quantized to 5-bits to further reduce the memory needs. I was trying to fit the entire model within the GPU’s VRAM. Sadly, it needed slightly over the 6GB I had. But I was able to split the neural network, loading 32 of the key neural network layers into the GPU and keeping the rest on the CPU. With that, I was able to achieve 14 tokens per second (a way to measure how fast the model generates words). Not bad!
I began to test the model. I love to test LLMs with a simple riddle*. You would probably not be surprised to know that many models tell me I haven’t given them enough information to answer the question. To be fair, some humans do to. But for my experiment, the model answered correctly:
> Ram's mom has three children, Reshma, Raja and a third one. What is the name of the third child?

The third child's name is Ram.
I went on to have the model help me write some code to build a python flask based chatbot app. It makes mistakes, especially in code, but was extremely helpful in accelerating my project. It has become a valuable assistant for my weekend coding distractions. My next project is to provide a vector database to allow it to reference additional information and pull current data from external sources.
I said this before, but I do believe we are on the cusp of a technological transformation. These are incredible tools. As with many other technologies that have been introduced, it has the amazing potential to amplify our human ability. Not replacing humans, but expanding and strengthening us. I don’t know about you, but I’m excited to see where this goes!
Stay curious! Keep experimenting and learning new things. And by all means, keep writing. Keep thinking. It is what we do… on to the next word… one after the other… until we reach… the end.
“Imperfect things with a positive ingredient can become a positive difference.” – JasonGPT
I don’t know how you are wired, but for me, I become intoxicated with new technology. I have a compulsive need to learn all about it. I’m also a kinesthetic learner which means I need to be hands on. So into the code I go. My latest fixation is large language models (LLMs) and the underlying generative neural network (NN) transformers (GPTs) that power them. I confess, the last time I built a NN, we were trying to read George H.W. Bush’s lips. And no, that experiment didn’t work out too well for us… or for him!
Do you want to know what I have discovered so far? Too bad. I thought I would take you along for the ride anyway. Seriously, if you are fed up with all the artificial intelligence news and additives, you can stop now and go about your week. I won’t mind. Otherwise, hang on, I’m going to take you on an Indiana Jones style adventure through GPT! Just don’t look into the eyes of the idol… that could be dangerous, very dangerous!
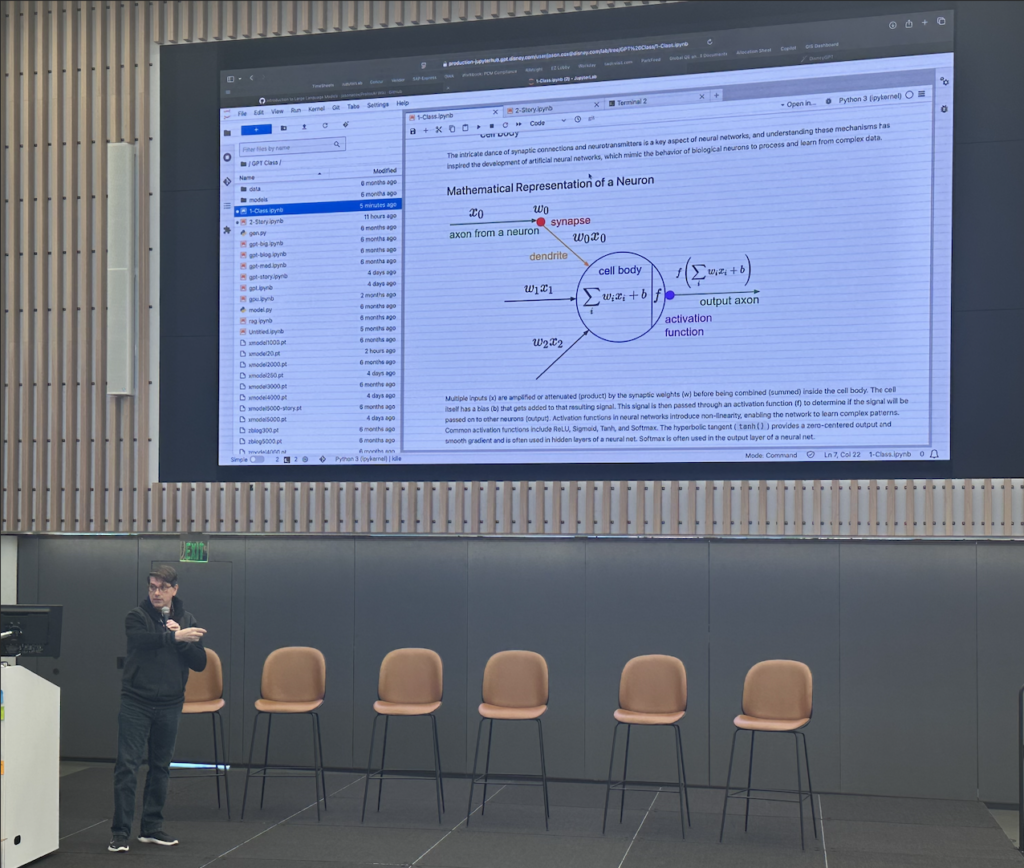
Where do we start? YouTube of course! I have a new nerd crush. His name is Andrej Karpathy. He is a Slovak-Canadian computer scientist who served as the director of artificial intelligence and Autopilot Vision at Tesla and currently works for OpenAI. He lectured at Standford University and has several good instructional lectures on YouTube. I first saw him at the Microsoft Build conference where he gave a keynote on ChatGPT but what blew me away was his talk, “Let’s build GPT: from scratch, in code, spelled out.” (YouTube link). It’s no joke. He builds a GPT model on the works of Shakespeare (1MB), from scratch. After spending nearly 2 hours with him, Google Colab and PyTorch, I was left with a headache and some cuts and bruises. But I also had an insatiable desire to learn more. I have a long way to go.
The way I learn is to fork away from just repeating what an instructor says and start adding my own challenges. I had an idea. I have done a lot of writing (many of you are victims to that) and much of that is on my blog site. What if I built a GPT based solely on the corpus of all my writing? Does that sound narcissistic a bit to you too? Oh well, for the good of science, we go in! Cue the Indy music. I extracted the text (468k). It’s not much, but why not?
By the way, if you are still with me, I’ll try to go faster. You won’t want to hear about how I wasted so much time trying to use AMD GPUs (their ROCm software sucks, traveler beware), switched to CPUs, Nvidia CUDA and eventually Apple Silicon MPS (Metal Performance Shaders built in to the M1). All the while, I was using my fork of the code I built with Andrej Karpathy (ok, not him directly, but while watching his video). I started off with the simple Bigram NN Language model. And it is “Bi-Gram” not “Big RAM” but I found that to be ironically comical in a dad joke sort of way.
My JasonGPT bigram.py started learning. It ran for 50,000 iterations and took about 8 hours. It even produced an output of random musings. While there was quite a bit of nonsensical output, I was amazed at how well this small run did at learning words, basic sentence structure and even picked up on my style. Here are some samples from the output I found interesting, comical and sometimes, well, spot on:
It’s a lot of time… But I think we also need science.
What are your big ideas?
Set our management to the adjacent ground (GND) pin.
I have a task to Disneyland out that this day.
I love the fun and fanciful moments as kids get to dream into their favorite characters, embrace the identity of their heroes, wrap themselves up starfish back.
Bring on the “power” of his accidental detail.
Your character provided faith, all kindness and don’t care.
Grab a difference too.
After several days of emailing, texting and calling, I received a text message.
Curl has the ability to provide timing data for DNS lookup, it will easily show or avoided.
Imperfect things with a positive ingredient can become a positive difference, just get that time.
I also believe we should exploit the fusion power that shows up each day in our company’s data.
Have you found a vulnerability? Are you concerned about some missing measures or designs that should be modernized or addressed? If so, don’t wait, raise those issues. Speak up and act. You can make a difference.
“I know what you are thinking.” the irony
We are the ones who make a brighter day.
The journey ahead is ahead.
What are you penning today? What adventures are you crafting by your doing? Get up, get moving… keep writing.
Look, it’s no ChatGPT, but it blew my mind! I’m only using a 4 layer NN with 7 million parameters. In comparison, ChatGPT uses 96 layers and 175 billion parameters! Before the weekend ended, I set up nanoGPT to build a more elaborate model on my data set. It’s still running, but already I can see it has learned a lot more of my style but seems to lack some focus on topics. It’s easily distracted and interrupts its own train of thoughts with new ideas. Squirrel! Nothing like me.
So my JasonGPT won’t be writing my Monday updates anytime soon, but who knows, maybe it will help me come up with some new ideas. I just hope it stays benevolent and kind. I would hate for it to suddenly become self-aware and start…
Typhoon warning! My nephew is a Lt. Commander in the US Navy currently stationed in Guam. He teaches and manages trauma and emergency care at the hospital. Last night, he was preparing his family for the typhoon that would be sweeping across the small Pacific island in just a few hours. They closed the storm shutters, stored their Jeep in the basement and ensure their backup power and pumps were working. My nephew drew the short straw at the hospital and will be managing the ER while the storm rolls through. I worried about the hospital being built for these type of events and he assured me that it was, but of course, he was quick to add that the generators were built by the lowest bidder.
There is another typhoon coming. Gazing out over the technology horizon we can see a storm forming. But this one seems to be more than heavy winds and rain. I’m talking about the recent astonishing developments in generative artificial intelligence (GAI). I’m increasingly convinced that we are sitting on the edge of another major tectonic shift that will radically reshape the landscape of our world. Anyone who has spent time exploring OpenAI’s ChatGPT or Dall-E, Google’s Bard, Microsoft’s Bing or Co-Pilot, Midjourney, or any of the hundreds of other generative AI tools out there, will immediately recognize the disruptive power that is beginning to emerge. It’s mind blowing. GAI’s capacity to review and create code, write narratives, empathetically listen and respond, generate poetry, transform art, teach and even persuade, seems to double every 48 hours. It even seems that our creation has modeled the creator so well that it even has the uncanny ability to hallucinate and confidently tell us lies. How very human.
I have never seen a technology grow this fast. I recall the internet in the late 1980’s and thinking it had the amazing potential as a communication platform. Little did I realize that it would also disrupt commerce, entertainment, finance, healthcare, manufacturing, education and logistics. It would create platforms for new businesses like the gig economy and provide whole new levels of automation and telemetry through IoT. But all of that took decades. Generative technology is announcing breakthrough improvements every week, sometimes every 48 hours. To be fair these large language models (LLMs) are all using decades old research in neural network (NN) technology. However, when you combine those NN with enhancements (e.g. newer transformers, diffusion algorithms), hardware (e.g. GPUs) and rich data sets (e.g. the internet) they unleash new capabilities we don’t even fully understand. The latest generations of the LLMs even appear to be doing some basic level reasoning, similar to how our own organic NNs help us solve problems.
Businesses are already starting to explore the use of this technology to increase productivity, improve quality and efficiency. Wendy’s recently announced that they are partnering with Google to use GAI to start taking food orders at their drive-throughs.1 Gannett, publisher of USA Today and other local papers, is using GAI to simplify routine tasks like cropping images and personalizing content.2 Pharmaceutical companies like Amgen are using GAI to design proteins for medicines.3 Autodesk is using GAI to design physical objects, optimizing design for reduced waste and material efficiency.4 Gartner identifies it as one of the most disruptive and rapidly evolving technologies they have ever seen.5 Goldman Sacks is predicting that GAI will drive a 7% increase in global GDP, translating to about $7 trillion!6
It’s time to prepare for the typhoon. I’m excited about the future! As a technologist, I know disruptions will come, challenging our thinking and changing how we work, live and play. I know it can also be terrifying. It can prompt fear, uncertainty and doubt. But now is the time to prepare! Don’t wait to be changed, be the change. Start exploring and learning. I have a feeling that this new technology will be a 10x amplifier for us. Let’s learn how we can use it, work with it and shape it to be the next technological propellent to fuel our journey to a greater tomorrow!
This blog text was 100% human generated but the image was created with OpenAI Dall-E2.
It was the first day of the pottery class. The instructor welcomed the students and began to orient them on the material. He announced that the final grade would be determined by one of two measures. For half the class, he said that their final grade would be determined by the “quality” of their pottery. Their goal was to work on a single high quality product. For the other half of the class, he said that their final grade would be determined by “quantity”. Their goal was the sheer amount of pottery produced. Fifty pounds of pots would be rated an “A”, forty pounds a “B”, and so on. The class began and the students began their work.
The last day of class finally came and a curious fact emerged. The works of highest quality were not produced by the group focused on quality. Instead, the highest quality works were all produced by the group graded for quantity! It seemed that the “quantity” group got busy producing piles of work and learning from their mistakes as they went along. In contrast, the “quality” group sat around theorizing about perfection, and in the end had little to show for their work than some theory of perfection and a lump of dead clay.[1]
The key to becoming a great artist, writer, musician, etc., is to keep creating! Keep drawing, keep writing, keep playing! Quality emerges from the quantity. It strikes me that the same thing applies to software and systems we run. When we focus purely on the quality, we actually miss the mark. The way to improve quality is to keep creating, testing and learning. In the software sense, we want to keep releasing our code as often and as fast as possible. By doing that, we build operational expertise, knowledge and automation. We develop fast feedback loops that nudge the digital clay into a better shape. We tune processes to provide faster feedback loops, remove toil through automation, and minimize human error and mistakes. We optimize for a high throughput of working products and reap the prize of high quality outcomes.
But does this hold true? In my career, I have seen this to be true time and time again. Areas where we remove friction and optimize for faster release cycles (even multiple times a day), with automated integration, testing and delivery, ultimately result in higher quality products. I see the same thing looking out to the industry. The highest performing teams optimize for highest flow. The prize of perfection comes by delivering and learning. In the book, “Accelerate: The Science of Lean Software and DevOps: Building and Scaling High Performing Technology Organizations,” Dr. Nicole Forsgren, Jez Humble, and Gene Kim ran a multi-year research project looking at practices and capabilities of high-performing technology organizations. Their conclusion was that the highest performing organizations embraced the notion of continuous delivery, the ability to deliver changes frequently, reliably and with minimal manual effort.[2]
We ship! As technologist, software engineers and SREs, our teams help design, build and run the digital trains that deliver amazing products and experiences to our customers and fellow employees every single day. Our goal is to make these experiences shine! And, as the pottery class learned, it is quantity of our practice and continuous learning that makes them more perfect.
Keep shipping. Keep improving. Keep delivering!
References
The pottery parable is a true story as captured by David Bayles and Ted Orland in their book, Art & Fear. There is a similar story about photography in James Clear’s book Atomic Habits.
Accelerate: The Science of Lean Software and DevOps: Building and Scaling High Performing Technology Organizations by Dr. Nicole Forsgren, Jez Humble, and Gene Kim also identifies other key traits of high performing organizations, including having loosely coupled architecture, embracing a learning culture of experimentation, adopting lean principles to optimize flow, and creating a high-trust and empowering environment.
Forsgren, N., Humble, J., & Kim, G. (2018). Accelerate: The Science of Lean Software and DevOps: Building and Scaling High Performing Technology Organizations. IT Revolution Press.
Bayles, D., & Orland, T. (1993). Art & Fear. The Image Continuum.
Clear, J. (2018). Atomic Habits: An Easy & Proven Way to Build Good Habits & Break Bad Ones. Avery.