The Amazing Samsung B630 LCD TV
On 6/20/09, we purchased a Samsung B630 40″ LCD TV. The B630 has an amazing picture. The 120Hz and high contrast features make this 1080p LCD monitor simply a delight. The unit comes with 4 HDMI inputs as well as two standard A/V inputs for game consoles (great for the kid’s Wii and Playstatation2). It also has a network port that pulls in news and weather feeds so you can hit an “info” button the remote and get semi-transparent overlay info boxes while watching your favorite show or movie.  Yes, this is more of a gee-whiz feature than actually useful though we have used it to check the local weather–its accuracy hasn’t been very impressive.
The set has an audio optical out. I have this fed in to the Samsung DVD home theater system we purchased with the TV. As expected, the sound is great but activating it always generates a pause while the TV and receiver sync up. The set also has a USB port on the side that allows you to play media files (pictures, music and movies) from thumb drives and external hard drives. It is a fantastic feature and providing you have a good quality USB drive, it will stream beautiful full 1080p video.
HDMI Problems
Just over 2 months after buying the unit, our cable suddenly stopped working on our new Samsung B630 LCD TV. After some quick troubleshooting I discovered that it was only the HDMI-1 input that the cable box was using. The Samsung DVD Player on the 2nd HDMI port worked fine and the Cable would work when plugged in to any of the other inputs.
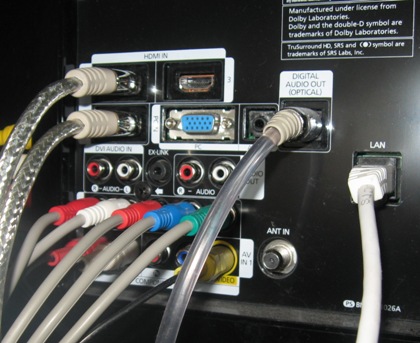
I notice another strange behavior. When the Cable and DVD cables were plugged in to HDMI-2 and HDMI-3, only one of the source inputs would work. If you select 2 or 3, you would still see the same thing (the Cable which was plugged in to HDMI-3). Moving things around to the other ports, I was able to do the same thing with the DVD. This mean that we were not able to use the 2nd or 3rd ports to have HD signal from both the Cable and DVD player. I eventually hooked up the component cables for the Cable box to the TV so that we could continue to view the up-conversion HD quality of our DVDs.
Samsung Support
The Sumsung website let’s you register and request repair for your Samsung products. Besides the Samsung LCD TV and Home Theater System, we purchased and registered our Samsung washer and dryer. The website can be very frustrating at times. It is slow and will frequently glitch. At one point, I encountered a page that had a huge listing of products, complete with their serial numbers and details from other customers. I didn’t drill in to see if it would present me with customer PII data, but clearly it shows that their web development team has work to do.
I did manage to report the HDMI problem via the website. It does require that you upload the original receipt. Unfortunately we had lost this (yes, not a good thing) but we had purchased this at Sears and the sears.com site will allow customers who used their Sears credit to view transaction receipts online. This allowed me to copy/paste into a Word document and upload that to the Samsung site. The site let us pick a date for the in-home repair and selected Monday. We received a call the next morning from the repair team. After getting the details of the problem, they moved the schedule to Tuesday and said they would bring the components that they felt would fix the HDMI problem.
Repair Visit #1
The in-home repair technicians arrived and brought the mainboard replacement. It looks like a small PC motherboard and is located in the lower left hand corner of the back of the TV, behind the connectors. I took a picture as the techs were installing the new motherboard.
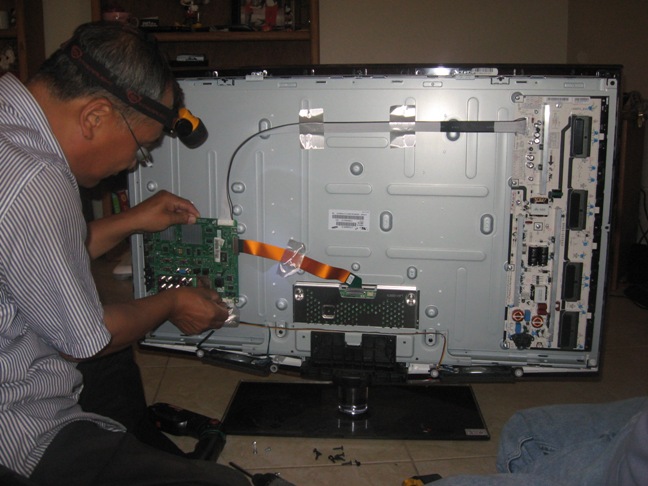
After installing the new motherboard, the TV flashed a red error message at the top of the set. The tech attempted to reset the unit using various menu options (picture, firmware, etc.) but it would not clear. He said that the new mainboard was defective and he would need to order a new one. He re-installed the old mainboard.

Samsung B630 LCD TV Mainboard
After installing the old mainboard, the HMDI ports started working again! I asked what they did and he said that it looks like the mainboard has a faulty connector that caused the outage. He said that it does need to be replaced and they would order a new mainboard. Until then, the HDMI may or may not stay working. Hopefully it will keep working until they return for their second visit.
It is interesting that Samsung would not quality check their mainboards before sending them out in to the field. It seems to be a bit inefficient and if our old main-board had not mysteriously started working, it would be very frustrating for the customer. But I will say that the repair technicians were very good. They were friendly and quick.
Repair Visit #2
The technicians returned in two weeks to install the new mainboard. Thankfully the HDMI port did not go out again before the second visit.
References
Samsung B630 LCD TV Manual
Samsung Website for B630 (firmware updates, FAQs, manuals, etc.)
 USB Files