ATtiny85 Arduino Programming with Sparkfun Tiny Programmer on a Mac

This guide will help set up a Mac OS computer to program an ATtiny 85 using the USB Tiny AVR Programmer from Sparkfun and the Arduino IDE.

Required Items:

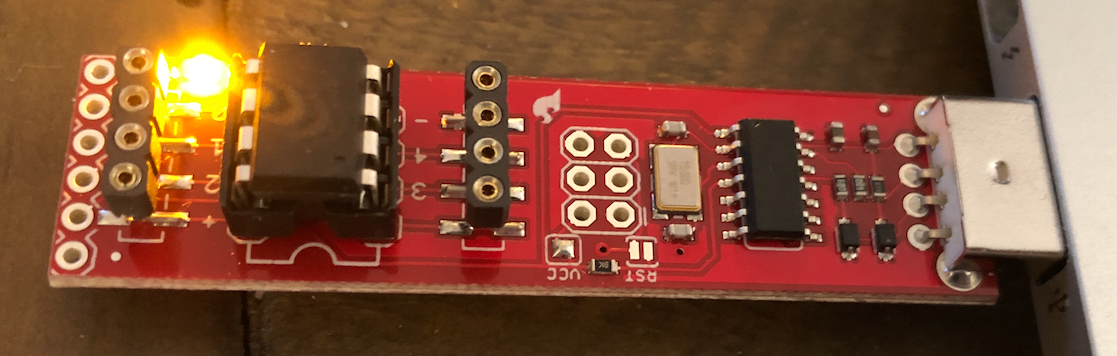
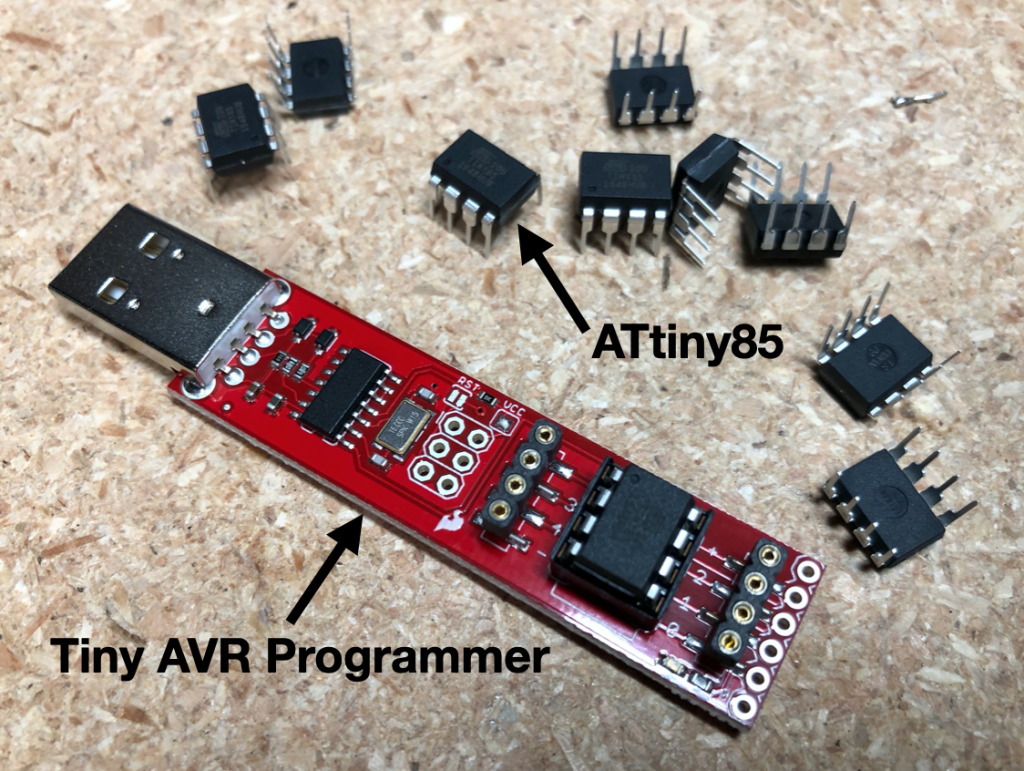
  • Sparkfun Tiny AVR Programmer (Sparkfun) – This is a handy USB based programmer for ATtiny microcontrollers. It is powered by an ATtiny84 that is set up as a USBtinyISP programmer. The board has an 8 pin socket to hold a ATtiny45/85 microcontroller that you want to program.
  • ATtiny 85 Microcontroller (Digikey) – The ATtiny85 is a low-power 8-bit microcontroller based on the AVR enhanced RISC architecture.
  • Arduino IDE (Download)
  • Mac computer (e.g. MacBook Pro) with OS 10.14 or later

I used the following steps to get the Sparkfun Tiny AVR Programmer working on my Mac. Hopefully this will be helpful for you as well. Your experience may vary.

Step 1: Install ATtiny85

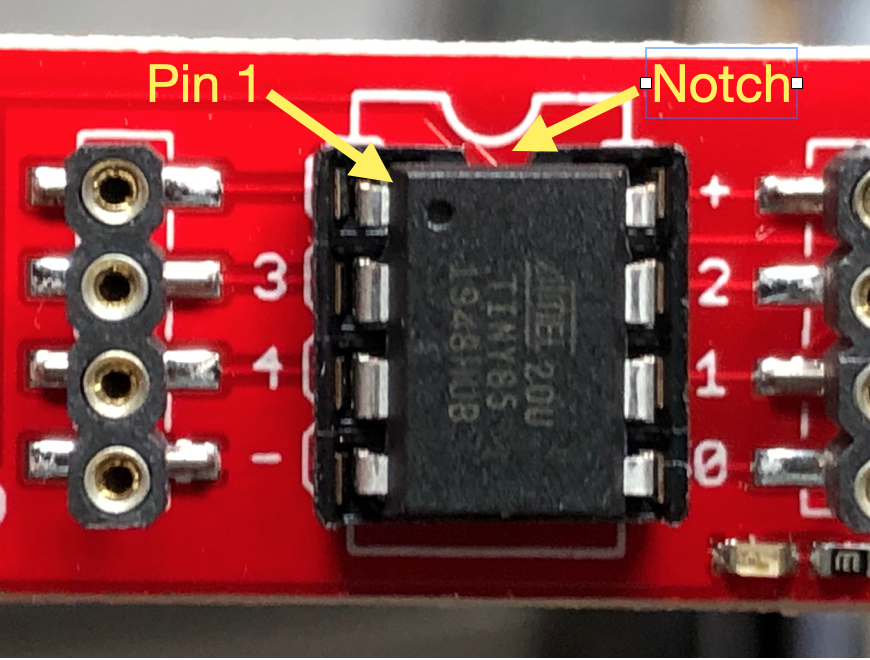
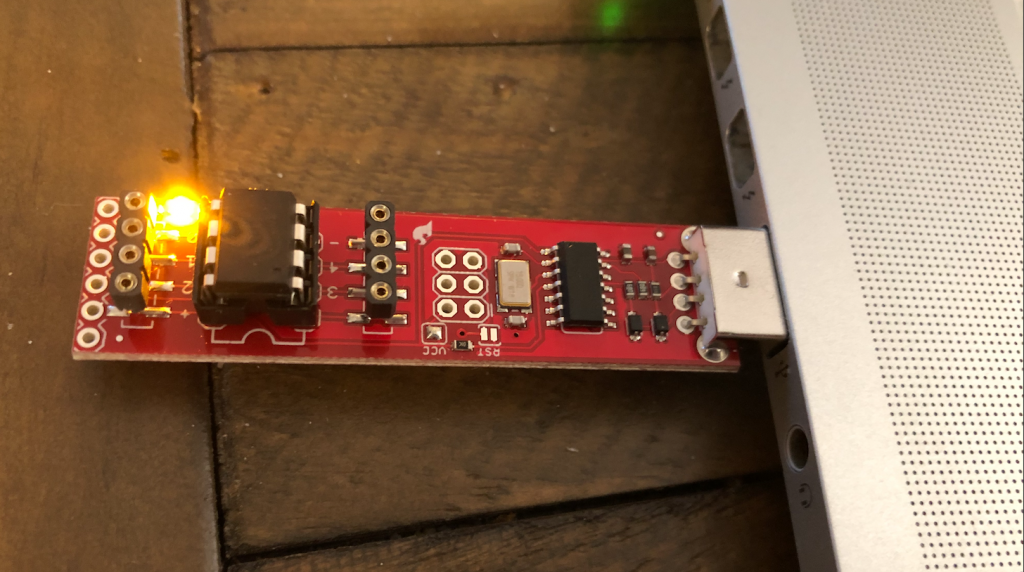
Install the ATtiny 85 into the programmer. Make sure you orient the chip so that pin 1 (usually identified by a dot) is by the notch. Once this is installed, plug the USB into your computer. You will not see a light and Mac OS will not recognize it as a serial port (don’t worry).

Install ATtiny into Programmer

Step 2: Set up Arduino IDE

Install the Arduino IDE software (Download) and navigate the menu Arduino -> Preferences and in the field for “Additional Board Manager URL” paste this link:

https://raw.githubusercontent.com/damellis/attiny/ide-1.6.x-boards-manager/package_damellis_attiny_index.json

Click “OK” to save and restart the Arduino IDE. Navigate the menu Tools -> Board -> Boards Manger and type “attiny” into the top search board and there will click on the “Install” button on the attiny board package.

Find the attiny board package and Install.

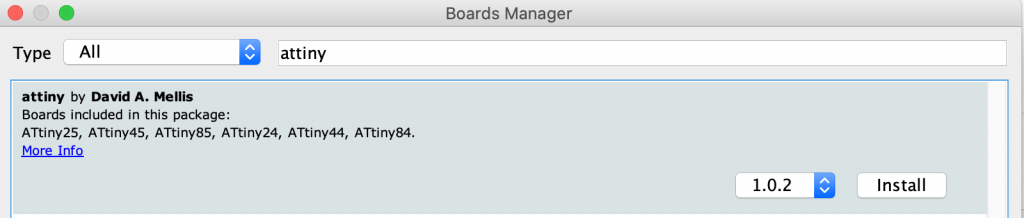
You should now see an entry for ATtiny in the Tools > Board menu. Select “ATtiny25/45/85”.

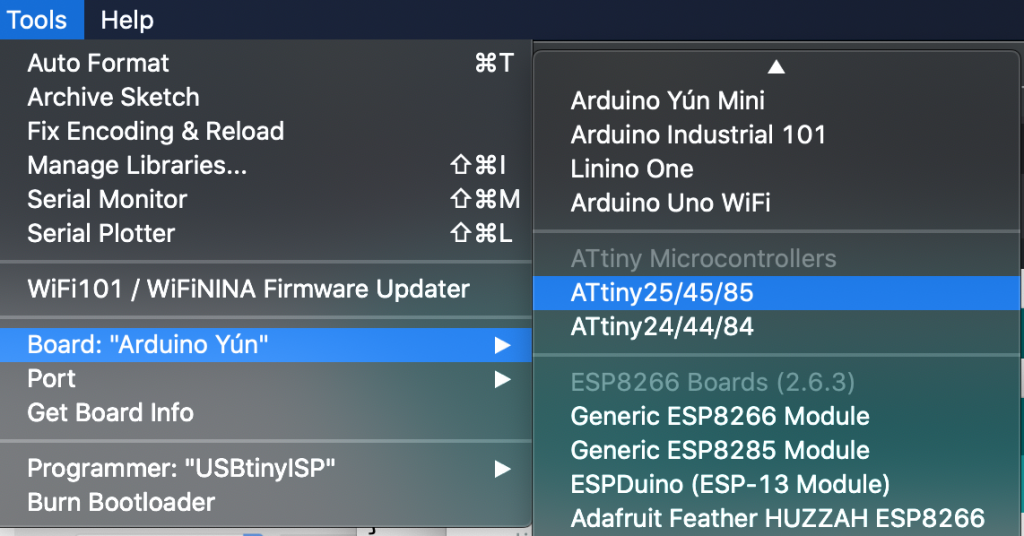
For “Processor” select the chip you are using, e.g. ATiny85.
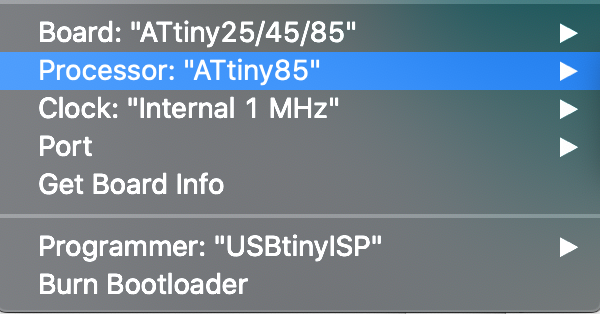
For “Programmer” select “USBtinyISP

For “Clock” unless you have an external crystal in your circuit, you should select “Internal” and 1 MHz seems to be fine for most projects.

Finish by clicking “Burn Bootloader“. You should see the LED on the programmer flash. If it doesn’t work, you may need to Quit the Arduino IDE and restart to try again.

Please note: On the Mac, you do NOT select a serial “Port”. The IDE will program the ATtiny through the USBtinyISP that is loaded on the Tiny AVR Programmer board.

Step 3: Program your ATtiny85

You can use the example blink test to make sure you can program your ATtiny85. You can use the built in blink test but you will need to change the LED_BUILTIN to be 0 (zero). You can also copy and past the following code:

void setup() {
  pinMode(0, OUTPUT);
}
void loop() {
  digitalWrite(0, HIGH);   
  delay(1000);                       
  digitalWrite(0, LOW); 
  delay(1000); 
}

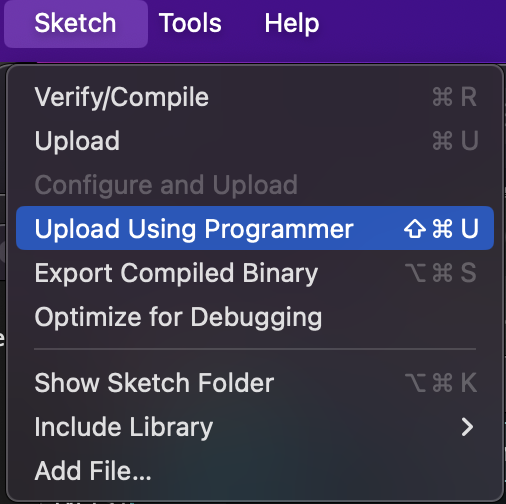
Arduino 1.x IDE: Click the upload button (right arrow) or press Command-U.

Arduino 2.x IDE: Select Sketch > Upload Using Programmer or Shift-Command-U

Arduino 2.x IDE – Uses “Upload Using Programmer” or Shift-Cmd-U

Once uploaded, the built-in LED should start to flash.

Example “blink” program running on ATtiny85

The ATtiny85 has PWM (Pulse Width Modulation) outputs so you can use the analogWrite() function to adjust the brightness of the LED from 0 to 255. Here is an example that fades the LED.

/*
  Fade
  This example shows how to fade an LED on using the analogWrite()
  function.
  The analogWrite() function uses PWM, so if you want to change the pin you're
  using, be sure to use another PWM capable pin. On most Arduino, the PWM pins
  are identified with a "~" sign, like ~3, ~5, ~6, ~9, ~10 and ~11.
*/
int led = 0;           // the PWM pin the LED is attached to
int brightness = 0;    // how bright the LED is
int fadeAmount = 1;    // how many points to fade the LED by
void setup() {
  pinMode(led, OUTPUT);
}
void loop() {
  analogWrite(led, brightness);
  brightness = brightness + fadeAmount;
  // reverse the direction of the fading at the ends of the fade:
  if (brightness <= 0) {
     analogWrite(led, 0);   
     delay(1500);
     fadeAmount = -fadeAmount;
  }
  if(brightness >= 255) {
    fadeAmount = -fadeAmount;
  }
  delay(10);
}

References

This was tested on Arduino 1.x and 2.x IDEs, on an Intel i7 based Apple MacBook Pro and on an M2 based MacBook Air using an USB-C to A adapter.

Solar Powered WiFi Weather Station

I’ve always wanted to add a backyard weather station to help record not just temperature data, but humidity, pressure, rainfall, wind speed and UV levels. My recent experiments introduced me to the ESP8266 NodeMCU, a low-cost microcontroller with embedded WiFi. I just needed to add a solar cell, a battery, a sensor and an enclosure.

Solar Power

I found a 2.5W 5V/500mAh solar cell (from Amazon) and a 3.7V 3000mAh rechargeable Li-ion battery pack (Amazon). After some research (see here), I added a TP4056 charger module (Amazon) that regulates the charging and protects the battery from overcharge.

Solar cell and battery charging circuit.
Solar Cell + Battery Power Supply

I added a 0.1uF ceramic capacitor and 100uF electrolytic capacitor to smooth the output voltage. I used a simple 3.3v voltage regulator (DigiKey) to feed the 3.3v bus for the ESP8266 and sensors.

Voltage Divider
Voltage Divider

Monitoring the voltage coming from the solar cell and/or battery would help determine if the system is getting enough power during the day to keep the system running at night. The ESP8266 has an analog input (A0) that can be used to determine the output voltage but it can only handle up to 3.3v. By using a simple 2 resistor divider circuit (see right) I could monitor the voltage and apply a multiplier to get to the actual voltage I measured with a multimeter. In this case, the A0 pin was reporting 907 when the multimeter was showing 4.69v so I used 4.69 / 907.0 and further sampled other readings to ensure I had the correct value.

Voltage Charge and Discharge over 4 Days

Circuit Design

The sensors I wanted to add included a BME280 pressure and humidity sensor, a one-wire DS18B20 temperature sensor and a 2N2222 transistor powered rain detector. I put the circuit together using a simple breadboard and started on the code.

Prototype Solar Power Weather Station

Using the free open source KiCad electronic design software, I build a schematic drawing to help build the final non-breadboarded product.

Schematic - ESP8266 Solar Powered Weather Station
Schematic – ESP8266 Solar Powered Weather Station

Getting Started with Arduino IDE and ESP8266

The ESP8266 NodeMCU has a USB port that allows the microcontroller to be easily powered and programmed with the Arduino IDE . However, it is not as easy to set up and use as an Arduino device. I found out that you will need to install a driver to see the device on my MacBook (see here for MacOS instructions and download the USB to UART Bridge VCP Drivers here). Once the driver is installed, the Arduino IDE needs to be set up to manage the NodeMCU. The ESP8266 I purchased came with some instructions:

Instruction & Steps of How to use:
1. Download and Install the Arduino IDE (download here)
2. Set up your Arduino IDE as: Go to File->Preferences and copy the URL below to get the ESP board manager extensions: http://arduino.esp8266.com/stable/package_esp8266com_index.json
3. Go to Tools > Board > Board Manager> Type “esp8266” and download the Community esp8266 and install.
4. Set up your chip as:
Tools -> Board -> NodeMCU 1.0 (ESP-12E Module)
Tools -> Flash Size -> 4M (3M SPIFFS)
Tools -> CPU Frequency -> 80 Mhz
Tools -> Upload Speed -> 921600
Tools -> Port -> (whatever it is)
5. In Arduino IDE, look for the old fashioned Blink program. Load, compile and upload. Go to FILE> EXAMPLES> ESP8266> BLINK

Code

Once I had the ESP8266 connected, I could start creating the code. The code is available here: https://github.com/jasonacox/WeatherStationWiFi

Rain Sensor

Using a simple NPN transistor, you can detect the presence of water. I wanted to detect rain which mean that I needed to add a couple of electrodes connected to that transistor (for detection) and our power supply. Water allows a small amount of current to pass through it to detect water, you will need to amplify it, hence the need for the transistor which turns a low current into a switch to a much larger current. The ESP8266 digital inputs can see the switched power from the transistor and can indicate water has been detected.

Wind Speed Sensor with an Anemometer

An anemometer is a device used to catch the wind and record its speed.

3D Printer

I found a 3D model on https://www.thingiverse.com/thing:2559929

More to come…

Installation

The Unicorn Project

The Unicorn Project: A Novel about Developers, Digital Disruption, and Thriving in the Age of Digital, by Gene Kim

This new novel by Gene Kim takes place simultaneously as the events of The Phoenix Project with many of the same characters, business challenges and end results. All of this continues to take place within the fictional company, Parts Unlimited. However, while the prior book gave us insight into the transformation of the operations team, this book chronicles the journey from a developers point of view.

The Unicorn Project takes you on a fun and inspiring journey into some of the most difficult IT and business challenges we face today.  The project may be mythical, but the lessons and ideals uncovered here provide real help and inspiration to any leader seeking to transform their business. Along the way, you discover people empowering, data driven and digital business enabling ways of working that can unleash the powerful potential within any organization. 

There are five ideals that are discovered through the course of the book that will help any business succeed.

  • The First Ideal – Locality and Simplicity
  • The Second Ideal – Focus, Flow, and Joy
  • The Third Ideal – Improvement of Daily Work
  • The Fourth Ideal – Psychological Safety
  • The Fifth Ideal – Focus on our Customer

I recommend this book for any business or technology student, professional or leader who is serious about leveraging data driven digital disruption and workforce empowerment to delivering business value faster, better, safer and happier.

More information about the Unicorn Project.

Home Automation – SentryPi

Who left the garage door open?

We have a full house with a lot of activity and visitors.  There have been several times when the garage door is left open for extended periods of time.  While our Christmas decorations and paint supplies may not be a treasure most would be thieves would desire, it is still not the most comforting thing to think about leaving the garage open for all passerby to see.  I often thought it would be great to have a way to notify whoever is in the house that the garage is open.

Phase 1 – LED Indicator

I decided that my first step would be to design a way to detect “door open” by providing a simple indicator light.  I explored a few optical ways to do this (light beam, camera, reflectors) but quickly pivoted my approach when I found some unused microswitches.

I found a good place to detect “closed” on the main track.  I thought about piggybacking on the garage opener sensors but dismissed that as I didn’t want to risk an undesirable interaction with the opener and more importantly, I wanted to have the detection work even if power to the opener was interrupted.

This required that I build a bracket to mount the switch to and a ramp plate to compress the switch when the door was in the down position.

I used an aluminum sheet, cut with sheet metal snips,  bent and drilled holes to mount the microswitch and eventually attach it to the garage door track.  It took a few tries to get the right fit and right placement of the micro switch.

My first attempt destroyed the microswitch after a few uses.  The garage door track sled has a straight edge that collides with the microswitch roller. It created too much force on the small roller and eventually popped it loose.  To help with that, I added an aluminum ramp to the sled so that the microswitch roller would gently rise as the sled entered the “closed” position.

I decided to make the “door open” state be the closed circuit condition so that phase 1 of the project could start as a simple LED circuit indicator.

I attached the switch and drilled some pilot holes and mounted the bracket to the garage door track right above the sled when the door is in the closed position.

I added a 9V battery, a 470 ohm resister and a red LED to the circuit.  To complete this phase, I ran the wire from the garage to our entry hall and mounted an LED and housing above the HVAC controls.  Now we can all see the brilliant red LED glowing when the garage door is open.  That covers some of our use cases but I also want a more proactive notification.  Now on to phase 2…

Phase 2 – Raspberry Pi – Home Automation Sentry

Now that I have a working “door closed” sensor and indicator, I am ready to add the proactive home automation component, specifically the Raspberry Pi (RPI).  It just so happens that I have a spare RPI Model 3 that needed a project, and I wanted to experiment with AWS IoT services.

I used the RPI to detect the state of the switch. To do that, I will need to wire the circuit into the RPI’sGPIO headers.  I decided to use GPIO Pin 23 and the adjacent ground (GND) pin.

Here is the code that is used to detect the closed circuit (indicating an open door):

#!/usr/bin/python

##  
## Garage Door Sentry - RPI script to monitor door
##  

## load libraries
import RPi.GPIO as io 
import time 

print "Garage Door Sentry\n\n"

## set GPIO mode to BCM - allows us to use GPIO number instead of pin number
io.setmode(io.BCM)

## set GPIO pin to use

door_pin = 23
print "Sentry Activated - Watching: GPIO 23"

## use the built-in "pull-up" resistor
io.setup(door_pin, io.IN, pull_up_down=io.PUD_UP)  # activate input

## States for door: 0=closed, 1=open, 2=init
door=2
## infinite loop
while True:
    ## if switch is open
    if (io.input(door_pin)==True and door!=0):
        door=0 
        print "Door closed"
        # do some action
    ## if switch is closed 
    if (io.input(door_pin)==False and door!=1):
        door=1 
        print "Door open"
        # do some action
    time.sleep(1) # 1 second wait

The next step was to connect to AWS IoT to record this sensor data and send alert messages to my phone.

The following will help you set up your Raspbery Pi as a platform to install the SentryPi scripts.

Required:

  • Raspberry Pi – B+, 2 or 3
  • Wifi Dongle or Network Cable configured
  • SD card (Recommend: 16GB or larger)
  • AWS Account (IoT, DynamoDB)

Read the details on this GitHub Project: https://github.com/jasonacox/SentryPi

The project describes how I added these additional features:

  • Sentry Alert – Send a text message to contacts when an alert condition is reached.
  • Dashboard – Provide an automation dashboard for realtime status.
  • Other Sensor Data:
    • Temperature Sensors
    • Barometric Pressure Sensor
    • Humidity Sensor
    • Motion Sensor

To set up a web based dashboard, I decide to use static HTML, CSS and JS (jQuery, Chart.js and the AWS JavaScript SDK) so it can be hosted on a simple S3 bucket, a web server, or the RPi itself.  See here for the code. 
SentryPi Dashboard
SentryPi Dashboard - Garage Door Graph

A Seat at the Table: IT Leadership in the Age of Agility

Book Review

A Seat at the Table: IT Leadership in the Age of Agility
by Mark Schwartz

This should be required reading for all technology and business leaders who are serious about digital transformation.  This book takes you on a provocative, fun and comprehensive tour of the key areas that will promote and ignite digital empowering agility, creativity, learning, community and collaboration.

This book may be about taking a seat, but this is no time to be sitting still!   IT leaders will be convinced that their job is now about incentivizing and inspiring courage, passion and technical excellence in service of business objectives rather than blindly servicing requirements. You will even find practical advice on how to deal with projects, scope creep, IT assets (what the author calls Enterprise Architecture), governance, security, risk management, quality, and shadow IT.

DevOps Handbook

devopshandbookDevOps Handbook: 
How to Create World-Class Agility, Reliability, & Security in Technology Organizations

These notable DevOps luminaries provide a comprehensive definition, patterns and guidance on implementing business winning DevOps culture and practices within your your organization.  Beyond just looking at successful DevOps principles from “unicorn” companies like Google, Amazon, Facebook, Etsy, and Netflix, the authors provide several practical examples and case studies where these same practices are helping traditional enterprise companies like Target, Nordstrom, Raytheon, Nationwide Insurance, CSG, Capital One, and Disney.

The handbook captures several quotes from industry practitioners as well as unpack patterns that help promote increased velocity, feedback and experimentation and learning.

http://itrevolution.com/citations-devops-handbook/

wordcloud-devops-handbook

How to Effectively Communicate to Leaders

As an leader who loves working with people, I often have the pleasure of hearing from individuals at all levels across the organization.  However, I am often amazed at how many people fail to communicate effectively with their leaders and others. They are terrible at scheduling meetings, pitching their idea or even asking for help. That got me to thinking, what advice would I give to anyone who needs to communicate with me or other leaders? I came up a list of 7 imperatives that I have learned from those who are the most successful.

1) Be contextual – I often have meeting invites or receive emails or presentations that provide little or no context. The senders may have mentioned it in a prior exchange and are usually saturated in the subject themselves, but most leaders are constantly task switching and juggling multiple ideas, projects, discussions, etc., and can struggle to make connections back to the senders requests. While we all want to be superhuman and always “know what you are talking bout”, the truth is that we have a finite capacity to retain more than a handful of contexts. Provide “helps” to onboard the leader and the rest of the audience quickly. That will help you succeed in getting the point across and if needed, a decision. I love seeing context in the meeting invite or email, or in the case of ad hoc meetings, and introductory summary for why he or she should listen to you.

2) Be brief – As with most leaders, I get several hundred emails, calls, texts and IMs per day. I must skim to survive. You should fashion your communications so that important ideas are highlighted. For written communication, make use of white space to help the eye quickly skim and do what you can to avoid unnecessary language. Can I suggest that executives aren’t the only ones who appreciate this and anyone who discovers this art of concise and effective communication will succeed in their career?

3) Be real – Leaders see through bogus accomplishments and self promotion. I’m most impressed with people who are respectful but direct, confident but humble, and candid but optimistic. They spend more time acknowledging others and the achievements of their team rather than their own.

4) Be kind – Good leaders have little tolerance for other leaders or managers who berate, belittle, or otherwise deal harshly with their team or others. Don’t expect to find a gracious audience with your own leader if you can’t deal respectfully, courteously and graciously with your own staff and partners. Treat others as you want to be treated.

5) Be honest – I’ve seen individuals and teams manipulate messages and presentations to get an executive decision or modify perception without providing all the details or slightly modifying the story. If you know something that could materially impact the decision process, why are you hiding it? Blocking signals to manipulate circumstances for your own benefit will backfire on you personally and in some cases have a significant impact on the company, brand, employees or customers. Be honest.

6) Be optimistic – Good leaders are not looking for everyone to be Pollyanna and will prefer a difficult truth to a comforting lie, but rarely are things without hope or some positive element. Bring a bias toward positive solutions, look for the opportunity in the disappointment, the lesson in a setback or wisdom in a failure. Business is about taking risks and moving forward from mistakes. Surround yourself with others who believe we can make a difference and impact the world for the better. Be an optimist.

7) Be proactive – Don’t just tell your leader what someone else needs to do, take action yourself. It’s great to have a plan to make something better and to bring that to the attention of your leader, but be prepared to be part of the solution!  Leaders are always on the lookout for a great idea with muscle. What are you doing to turn your great idea into reality? Get started.

This list is in no way comprehensive, but hopefully it will help you as it has helped me.

The Art of Business Value

art-of-biz-valueA review of The Art of Business Value by Mark Schwartz

Business value, the north star of Agile, Lean and DevOps champions, is often more difficult to determine than one would imagine. This book takes the reader on a journey to discover that value while along the way, creating helpful mental models, challenging preconceived notions and proposing some creative ways to transform an organization.

The author does a great treatment of ROI (Return on Investment – does anyone ever really measure that?), NPV (Net Present Value), MVA (Market Value Added) and SVA (Shareholder Value Added). I especially enjoyed the humorous practical example that revealed a surprising truth that acquiring an MBA can easily have a negative NPV (in other words, a bad investment!) So save your money and pay attention to the author’s “four-paragraph MBA” (p. 20) that unpacks the main two principles learned in an MBA: 1) There is time value of money and 2) A business venture needs a sustainable competitive advantage.

Legacy IT architecture and bureaucracy are often considered negatives and obstacles to progressive competitive relevance but the author brings a refreshing perspective on the “value” of that complex hairball of legacy and rules and the right way to polish and transform them.

On Agile…

“The purpose of an Agile team is to self-organize and meet the underlying business need in the best way possible, often by cutting through the bureaucracy.” (p 55)

On DevOps…

“The DevOps model…looks to break down the silos that have resulted from technical specialization over the last few decades. But the DevOps spirit goes further looking to eliminate the conflicting incentives of organizational silos and the inhumane behaviors that can result from those conflicting incentives.” (p 48)

On Bureaucracy…

“Bureaucracy delivers business value. Just sometimes not enough.” (p 59)
…”developers are bureaucrats by nature. We have a tendency to solve problems by creating standard processes rather than by relying on human judgment.” (p 54)
“The pipeline is an automated bureaucracy: it applies its rules in a rigorous, unemotional way, sine ira et studio. That does not mean that the software development process is unemotional; it means that the tools are unemotional and the passion is brought to the process by the people.” (p 105)

And on Business Value…

“Business value is a hypothesis held by the organization’s leadership as to what will best accomplish the organization’s ultimate goals or desired outcomes.” (p 90)

I highly recommend this book to IT leaders, digital executives, strategic managers, and anyone seeking to make their organization more agile, effective, relevant, competitive and humane.

Docker + Mesos + Marathon in AWS EC2

I wanted to see if I could get a Docker + Mesos + Marathon platform up and running quickly in AWS EC2 using t2.micro instances.  I found this great article by Gar (@gargar454) where he has put all the components in docker containers and provides a simple  tutorial which I paste below with some minor edits:

Create a Docker Host on EC2

Create your EC2 instances (Amazon AMI t2.micro will work), set it up in your private VPC and auto-assign a public IP so you can test.  You will need to open TCP ports 5050 and 8080 in  your security group from your workstation if you want to see the Mesos and Marathon UIs.   Run these commands to set up a docker host:

sudo yum update -y
sudo yum install -y docker
sudo service docker start
# grant ec2-user ability to run docker commands without sudo
sudo usermod -a -G docker ec2-user
# you must exist to refresh user rights
exit
  1. Export out the local host’s IP
    • HOST_IP=`wget -qO- http://instance-data/latest/meta-data/local-ipv4`
  2. Start Zookeeper
    docker run -d \
    -p 2181:2181 \
    -p 2888:2888 \
    -p 3888:3888 \
    garland/zookeeper
  3. Start Mesos Master
    docker run --net="host" \
    -p 5050:5050 \
    -e "MESOS_HOSTNAME=${HOST_IP}" \
    -e "MESOS_IP=${HOST_IP}" \
    -e "MESOS_ZK=zk://${HOST_IP}:2181/mesos" \
    -e "MESOS_PORT=5050" \
    -e "MESOS_LOG_DIR=/var/log/mesos" \
    -e "MESOS_QUORUM=1" \
    -e "MESOS_REGISTRY=in_memory" \
    -e "MESOS_WORK_DIR=/var/lib/mesos" \
    -d \
    garland/mesosphere-docker-mesos-master
  4. Start Marathon
    docker run \
    -d \
    -p 8080:8080 \
    garland/mesosphere-docker-marathon --master zk://${HOST_IP}:2181/mesos --zk zk://${HOST_IP}:2181/marathon
  5. Start Mesos Slave in a container
    docker run -d \
    --name mesos_slave_1 \
    --entrypoint="mesos-slave" \
    -e "MESOS_MASTER=zk://${HOST_IP}:2181/mesos" \
    -e "MESOS_LOG_DIR=/var/log/mesos" \
    -e "MESOS_LOGGING_LEVEL=INFO" \
    garland/mesosphere-docker-mesos-master:latest
  6. Goto the Mesos & Marathon Web pages
    # You can find your EC2 instance public IP address with:
    wget -qO- http://instance-data/latest/meta-data/public-ipv4

    Mesos Web Page

  7. http://<public-ip>:5050

Marathon Web Page

http://<public-ip>:8080

Create an App (+ New App button) on the Marathon page to see the task get assigned to a Mesos slave and executed.

Marathon New App - test1

Log in to the slave container and watch the file grow:

docker exec -it mesos_slave_1 /bin/bash

tail -f /tmp/running.out

AppleTV Development – OpenSSL and libcurl

In doing development for the new AppleTV, I was unable to find a cross compiled version of OpenSSL and cURL (libcurl) to use for my project.   I found a helpful OpenSSL script (here) that addressed some the unique tvOS challenges (e.g. fork() is not available) and used that build script to construct an libcurl build script.

The following repo contains scripts to build OpenSSL and cURL (libcurl) for OS X, iOS and tvOS with Bitcode enabled for iOS, tvOS. It includes the required patching for tvOS to not use fork(). This requires Xcode7.1b or later for the tvOS SDK.

https://github.com/jasonacox/Build-OpenSSL-cURL