Early on Saturday morning I make my way down to our kitchen. I fire up the coffee pot and begin dealing pans out across the stove. I pull out the breakfast ingredients and start dicing, chopping and cooking. The clanging of the cookware and breakfast making can be heard throughout the house. Soon the odor of the simmering morning meal will fill our home.
I hear some rustling. The sleepy home begins to wake. For the past several years, the first to the table would be my mother-in-law. She came to watch the show, but more importantly, she came to get some goodies. I always prepared some peanut butter toast and fruit for her, mainly to help curb the “Is it ready yet?” endless loop. However that never deterred her back-seat-cooking instructions that I would receive. She loved food and loved cooking. When she was no longer able to manage the task herself, she would live vicariously through others, including me. As I cooked, she would dream into the past and tell me stories. She would relay wisdom from her many years and reflect on current events. We discussed the changing seasons, family, vocations, life and of course, the menu. She is gone now, but I will forever laugh about and cherish those moments.
My mom was a teacher. She taught 3rd grade most of her career, which meant that like it or not, I got really good at addition, subtraction, multiplication, division, reading comprehension, writing, social studies, the scientific method, maps and graphs. My mom believed that the third grade curriculum built a wide foundation for the rest of your education. Most kids left their teacher at school, but not me. I got to be public schooled and home schooled at the same time. To be fair, I needed it. I would much rather be goofing off, building tree houses, riding bikes and catching tadpoles in the local stream than studying some book, diagraming sentences or doing my math assignment. In hindsight, it was an incredible blessing to have a teacher for a mom. But she wasn’t just a teacher. She was an encourager. “You can be anything you want to be, I’m incredibly proud of you.” Words like that are fuel for life. She gave me confidence to try and courage to fail. She was my champion and my defender as well as my teacher and my mom.
Good mothers shape the future. They make an incredible impact on our lives. It may not even be our biological parent that has the biggest impact. Many of us were adopted by other moms. I recall so many who spoke into my life with some encouragement, kindness and yes, even some discipline, that all helped shape who I am today. We are all the sum of the many investments made in us by others. I’m sure many of you have similar stories. This coming Sunday, as we arrive at another Mother’s Day in the US, take this opportunity to reflect on those investments our moms have made in us and be thankful.
To all you moms out there, you make a difference! Thank you, mom!
“Everything changes and nothing stands still.” – Heraclitus
When I was a teenager, my family would often drive up to the northeast corner of Oklahoma to go canoeing. It was always early in the morning when the dew was thick on the leaves. The cool crisp air would be slowly warming to the rising sun. We would grab our paddles and slide our boat into the river. I should probably put quotes around “river” as there were times during the hot and dry springs that these were more like tiny creeks or streams. In any case, you never knew what you would find. Parts of the journey would be peaceful, quiet and serene. The water would become still like a mirror. You could hear your own breathing and the birds chirping in the distance. There was very little effort needed to keep going forward. You could sit back and rest, soaking in the quiet peacefulness as the canoe glided by itself through the smooth silvery surface of the deep.
Then it would happen. A distant roar would begin to break the silence. “Rapids ahead!” someone would yell to wake up the crew. The growing growl soon was accompanied by the sound of churning and splashing water. The noise became real. The white mist and foam of the rapids was upon us. My heart began to beat faster as the speed of the canoe accelerated toward the sound. Scrape! The shallowing speeding water suddenly exposed rocks and gravel that grabbed at the bottom of the canoe. It would veer to the left, then to the right as it collided with the relentless currents and moss covered rocks. “Paddle!” Adrenaline was high as we paddled to steer clear of the obstacles that would quickly flip or split the canoe. About the time we navigated the last biggest challenge we would round the bend to see a fallen tree blocking our passage. What do you do?! Around it, over it or under it? Most of the time we managed to go around it with vigorous paddling, but there was a time or two where we decided to see how much of the river we could fit in the canoe to ride with us. In any case, it would soon be over. Down the stream we would go. Soon the sound of the rapids would begin to fade behind us as the river smoothed out again. Breathe. Relax. We made it!
Change is the current of life. We never know what we will encounter. There will be unexpected events. Moments of bliss and joy will land on us like dew. At other times, the noise of the rapids will demand our fast action. We will encounter obstacles, scrapes, opportunities, turns and bends that may even tip us over at times. Don’t fear, we can do this! Grab your oar and begin to navigate the stream. The future is just up ahead! Let’s make it what we want it to be. Keep moving forward! It’s time to paddle.
Words are amazing. They can be written, thought, spoken or signed. They are the concrete structures of our abstract thoughts. Through words, we represent our world, our feelings and our actions. Sewn together, words mobilize concepts into story and unfold a connection between the author and the reader. Through words, I can step into your life and you, mine. I can feel. I can relate. I can sense the flow of my own cognitive energy as well as yours. Words allow me to grasp and challenge the clarity of the moment, the importance of the thought and the landscape on which our relationships are formed. Through my words, you can see me. Through your words, I can see you.
Communication is intimate. When we speak or write words we become vulnerable. Part of who we are is made accessible to others. When those words we send are loving and kind, we feel those warm connections and our brain triggers a neurochemical response making us feel more included, connected and wanted. When those words are cruel, attacking, or demeaning, we feel a surge of anger, exclusion, insecurity or apprehension. The words we use and how we respond to them can have a profound impact on our health and the health of others. They form or they destroy our relationships. They can build bridges or they can declare war. But worse than harsh words are no words at all. When there is a lack of communication it sends a signal of detachment, alienation and separation. Without words, we distance ourselves from others and sever the chance for connection.
Communication is vital. I think we often fail to appreciate the gravity of communication and its role in building and maintaining healthy relationships. Understanding and connecting to each other is paramount to living a rewarding life and accomplishing our business and personal goals. We all seem to intuitively know that. Yet surprisingly, we often fail at communicating, or at least, communicating well. Have you ever been in a situation where it was clear that there was a misunderstanding but you failed to speak up? Have you ever thought to yourself that you should reach out to someone to encourage them, but you didn’t follow through? Or perhaps, you knew there was a difficult conversation that you needed to have, but you just didn’t have the time or courage to do it? I can relate to those situations and more. It is vital to communicate, but it doesn’t mean it is easy.
Communication is an investment. It takes time and energy. Yes, it is even risky, after all, because it means we become vulnerable. But it is worth it. Words are powerful and the dividends are healthy, vibrant and growing relationships. As my friend, Jeff Gallimore always says, “Sharing is caring!” Spend some time this week caring for others by communicating. Share some feedback with kindness. Make someone’s day by giving some encouragement. Make the investment. Connect with others through this miracle we call words.
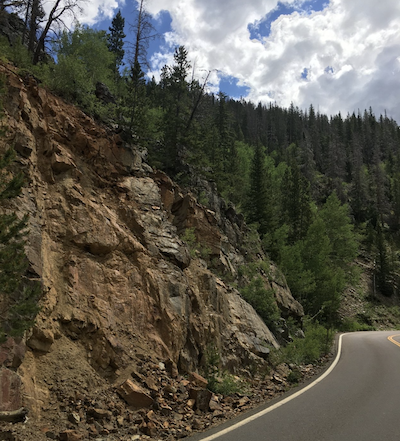
It was starting to get dark. Phantom shapes suddenly materialized ahead of me as the headlights of our van reflected off the road signs. Warning! Steep grades and winding road signs started to appear. We were making our way through the Rocky Mountains of Colorado. Large pines lined the horizon with steep cliffs jutting up to my left. I looked to my right and saw the shoulder of the roadway that had been carved into the side of the mountain plunge into the darkness for what seemed to be thousands of feet. Brake lights came one. Fellow travelers, like me were all gripping their steering wheel with the force of ten thousand angels. I tried to exhale as I cranked the van around the precarious turn.
Behind me I could hear the faint breathing of my girls fast asleep in their seats, little aware of the incredible tension happening in the driver’s seat. Around this corner, up the mountain, around that bend, down this curve, my eyes were fixed on the dizzying drama playing out before me. I kept hoping to hear the GPS announce our turnoff that would lead to our rest for the night. Instead, it just taunted me with “continue on” updates. But at long last, the glorious words, “exit here” and “you have arrived” gave me relief. Every muscle in my body was aching. I knew I was tense, but I had no idea how bad it was until I tried to step out of the van. I almost collapsed as my back reminded me that I was decades north of my youthful vigor. But thankfully, with some careful plodding, I made it to my long-awaited rest.
Have you ever experienced anything like that? In those moments the task at hand is so critical that you become physically tense, focused and locked. Every muscle in your body seems to want to help, but of course, it only leaves you sore and fatigued. The pandemic has been a long and winding road. About the time we hit a clearing, a major event occurs, a new strain, a setback or new mandates. Then we hit steep grades, big changes in our companies, inconceivable actions in our governments, and even chilling specters of global war. Are you tense yet? I know I am. For the past several weeks I have noticed the physical exhaustion and sore muscles that would usually only accompany a hair-raising journey across the Rockies, but this time it is from the front row driver seat of my office. I’m not alone. I have heard from others of you that are experiencing the same thing.
These are difficult times to navigate. Can I suggest a few things? The road is treacherous and winding right now. As you turn through those corners, make sure you keep your lights on. Hang on to your faith, your principles, your hope, your integrity and your character. Those radiate out from you and illuminate the dark path ahead. They also encourage those who are going along with you on this journey. Speaking of which, you are not alone. We are all going with you through this challenging patch together. Hit the brakes. Breathe. The signs along the road say, “slow down”. Give yourself time to process and recover from the last bend.
Yes, there will be more highway to travel before our exit, but we can do this. Relax. Take another breath, roll down the window and let the anxiety float away. Take one mile at a time. Enjoy the scenery. Appreciate those precious breaths behind you and enjoy the now. Our destination is just ahead and is full of hope and possibility… and with any luck, a good bed.
“Integrity, honesty, trust, respect, playing by the rules, and teamwork define the operating principles of our Company.” – Bob Iger
It was a tiny three-bedroom house in an older community in Tulsa. Our small family of three just expanded to four so we welcomed graduating from the tiny apartment to this small single-family home. Sure, it was a modest place but we loved it. We had people over. Birthdays, holidays and family gatherings were hosted there. But while memories were being made, sadly, cracks were forming. Literally. It started with some windows that would no longer open, doors that would not close and eventually graduated to full-inch sized cracks in the wall! What was happening? Our first home was literally breaking apart around us.
As you probably guessed, it was the foundation. The house had been built on fill and the support under it was crumbling away. We were devastated. We called a foundation repair company who came to fix our broken home. After days of digging, piering and preparing they were finally ready for the fix. In unison, the workers had assembled around the house and simultaneously activated the ratchets to lift the foundation. “One, Two, Three… Lift!” Pow! It was like a miracle. We watched all the gaps in the wall close. The windows worked gain and we could even close the door.
Integrity is a foundational principle. Our lives, our relationships, and our companies are built upon this foundation. To me, integrity is like a three-dimensional representation of honesty. On one axis, it says we seek truth even when it is inconvenient or painful. Integrity piers deep to find bedrock truth. On another axis, it demands reliability in word and deed. What we say we believe and will do, we do. The concrete of integrity is commitment and dependability. On another axis, it says that we are consistent, single faced rather than two-faced. We believe, we speak, we do in a unifying way that is honest, truthful and genuine. Wind, water, earthquakes and storms will rage against integrity, but it stands firm, consistent and true. When integrity is in place, the structures of our lives, society and businesses can be built with speed and confidence. When it isn’t there, cracks form. Doors close. Windows of opportunities are locked shut. Progress stops.
How is your foundation? I’m going to let you in on a little secret. We all fail. There are cracks in our foundation. We fib to ourselves and others. At times, we can be lazy or lacking in our commitments. But we don’t have to stay there! We can start over. We can change course and ratchet up the integrity in our lives. When we do, we activate a powerhouse of dependability, stability and resilience that we can build on.
Integrity establishes a firm foundation on which we can shape our future, our relationships, our society and our world. The ground is full of false narratives, inconsistencies, lies and disappointments. Don’t build your life on that shifting sand. Anchor yourself to the rock of truth. Be relentlessly honest with yourself and others. Be the consistent you that you can be. Stay the course and keep the faith. It will inspire others to do the same. “One, Two, Three… Lift!” Let’s close the gaps.
“I allowed myself to be bullied because I was scared and didn’t know how to defend myself. I was bullied until I prevented a new student from being bullied. By standing up for him, I learned to stand up for myself.” – Jackie Chan
Bullies. They can show up anywhere. In school, I had my fair share of encounters. I have to admit, I was an easy target. I wasn’t always the fine human specimen of physical strength that I am today. Ok, I’m not today either, but you get the point. Bullies looked for easy prey and I was easy to be found, hanging out in the science lab, at the computer table or in the journalism class. Somehow, I offended them in how I looked or what I said and it was time for a beating. “After school, Cox, I’m coming after you!” Despite my lack of athleticism, it turns out that I was a pretty good runner. But running away from bullies never made them go away. They always came back. I was a ripe canvas for their artisan craft of black eyes, knuckle sandwiches, name calling and wedgies.
I’m sure many of you have similar stories of bullies. When I was young, I naively thought I would outgrow the curse of bullying. Surely there are no adult bullies. Wow, was I wrong! It changes form and becomes sophisticated and sometimes even cloaked, but it is still there. I saw it in college. It showed up at the job, on the internet, in corporate at high ranking positions, in government with senior officials and of course, even on a global scale on the world stage.
To this day I have a strong visceral reaction to bullying. My life experience has made me passionately sympathetic with the victims. I can’t help but call it out when I see it and find myself moving to help at an instinctual level. I believe many of us are the same way. Looking at our human family across the planet, we see the profound reaction by people all over the globe. In the Russia and Ukraine conflict, there has been an overwhelming unity in the response to the action of one tyrannical bully set on the destruction of a smaller neighbor. I can’t stop thinking about it. I am grieved by the loss of life that we see unfold, impacting both Russian and Ukrainian soldiers and families. Bullies bring war, and war brings misery.
What turns people into bullies? Sure, I heard it all my life… You need to learn how to defend yourself. Teach your friends and your families how to deal with bullies. But what creates a bully? How can we help eliminate the next generation of bullies? We need to learn how to turn bullies into defenders, aggressors into protectors, haters into lovers and dividers into peacemakers.
I believe it starts with us. Don’t be a bully. We can all fall into the trap of power and personal ambitions without empathy. What we do impacts others and how they feel. We all have levels of influence and control. Let’s remind ourselves that our actions have a ripple effects on many others. Be considerate. Come to the aid of victims. Be the person you wish others would be to you. And in the process, maybe we can even help bullies see the err of their ways, and change.
“Hate cannot drive out hate: only love can do that.” – Martin Luther King Jr.
Happy Valentine’s Day! It is the day we pick to celebrate love. But, I have a question. What do we mean by “love”? I mean, really, what is love?
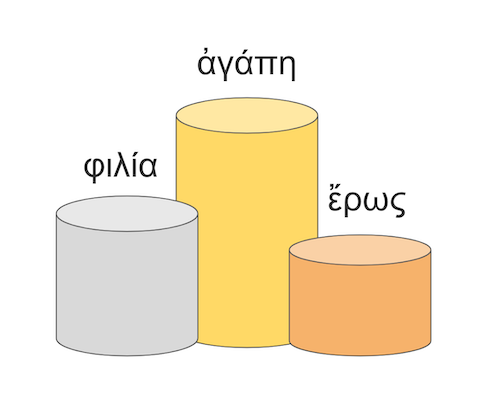
Did you know that there are seven distinct words in Greek that describe different kinds of love? With the Olympics going on, I reflected back on the two years I spent studying the Greek language and ancient Greek manuscripts as part of my Master’s program. I have to be honest, I barely got by. I kept looking at the Greek texts and thinking about math problems. I found it way easier to understand quantum mechanics than how to conjugate ancient Greek verbs into the correct indicative mood and pluperfect tense. Yet I found it profound that there are seven Greek words to represent the one word we have in English: Love. We have so overloaded that word that it seems to have lost all of its meaning. We “love” sunsets, our favorite Super Bowl winning football team, cars, family, artwork, friends and weekends. Is it all the same? The ancient Greeks didn’t think so.
Three of the seven Greek words for love really resonated with me. They are seen throughout ancient literature. I think they can give us a modern insight into love that we may have lost today. They are: Eros, Philia and Agape. In the spirit of the Olympics, I think they represent the three winning medals: bronze, silver and gold. I won’t make this a full course in etymology, but if you will bear with me, I would love (no pun intended) to unpack each one of those words and see how it relates to our modern concepts of love.
Eros is ἔρως. I warned you it would look like a math lesson. If that seems like it is all Greek to you, well it is. This bronze word represents love as a feeling and a passion. Plato and Socrates argue that eros is the soul acknowledging beauty. The emotional elements of this type of love are strong and is the etymology behind words like erotic. By far, this is the one form of love that we sing about the most. Huey Lewis says it is the “power”, The J Geils Band would say it “stinks” and Foreigner just wants to know what it is. Queen, Beyoncé and Jay-Z think it is “crazy”. Captain and Tennille think it keeps people together, but Tina Turner just wants to know what that has to do with it. Ray Charles can’t stop it and Whitney Houston will always have it. The Bee Gees want to know how deep it goes and Diana Ross and Lionel Richie know it is endless.
Philia is φιλία. Are you thinking about a fraternity or sorority by now? This shiny silver form of love is related to friendship, community, loyalty to friends, care for family and kindness to fellow equals, often expressed as “brotherly love”. Philia is the root of words like philosophy (love of wisdom) and philanthropy (love of human kind) representing the affection we place on things familiar and close to us. We see this at work in our lives through our affection and attraction to a group of like-minded individuals who also support us. In our community, this is expressed as a connection with individuals that have shared needs, experiences or goals. It can be tribal, national, or even global. Building communities and getting to know each other builds philia, which I think we can all agree, we could use a bit more of these days.
Agape is ἀγάπη. The Greeks built on the Phoenician characters, creating the first true “alphabet” (alpha beta) by including vowels along with constants. This form of love begins with alpha (α), the first letter. In a lot of ways, this golden form of love is elevated above the others in its expression and could be considered “the first love”. Unlike the other forms of love, this love is not determined by the object of the love. It is solely determined by the originator. Said differently, agape is not a love that arises from passion, reciprocation, community or even the loveliness or the familiarity of the object being loved. Instead, it is a willful, volitional love that is solely decided upon by the giver of this love without expecting anything in return. We often call this “selfless” or “self-sacrificing” love. It expresses itself in random acts of kindness, empathy, volunteer work and charity. It thinks about the other person more than itself. It is often considered a divine love, tightly coupled with mercy, unmerited kindness and grace. It seeks the good for others. It is the antithesis of hate. It gives. It endures. It loves no matter what. In this way, it is the pinnacle of love. It can change the world. In my mind, it gets the gold.
On this Valentine’s Day, I wish you love…. eros, philia and agape… but most of all, I wish you agape. Set your sights on the gold! Love others with all your heart.
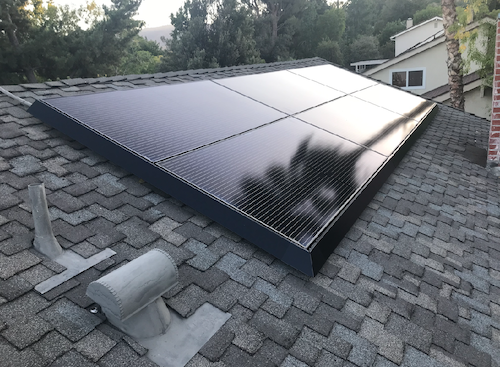
Net Energy Metering (NEM) allows homeowners who generate their power with solar panels to serve their energy needs and receive a financial credit on their electric bills for any surplus energy they feed back to their utility. In California, the NEM tariff is set by the Public Utilities Commision (PUC). In recent years, they have been contemplating changes that have create quite a stir by Solar owners. Utility companies, Pacific Gas and Electric (PG&E), Southern California Edison (SCE), and San Diego Gas & Electric (SDG&E) are requesting a change to cover the cost of operating the grid. Solar owers argue that the proposed changes would discourage solar energy and place a hefty tax on their Solar systems.
For my family, Solar was an investment we could make to help us transition us to a more green energy future. We computed our ROI along those lines with the expectation that incentives, especially net metering, could disappear soon. I fully admit that the Federal Investment Tax Credit (ITC) of 26% made it easier to justify but I know the utility based incentives may not be sustained forever.
The Problem with Residential Solar
It is easy to focus on the power rates for electricity but we often forget that there are capital and ongoing costs to run the grid infrastructure. This is true even if you rarely use the grid power. Regardless of your view of the utility companies involved, the truth is that there is capital and operational expense for us to have the luxury of pulling power from the grid when solar production is not enough to charge batteries or support our homes. If we are not paying that, those costs are getting distributed unfairly to non-solar customers. Studies show that this is typically lower income families who can’t afford solar installation fees.
However, the NEM v3 proposed $8 per kW of installed Solar generation per month may be a viable approach, but it does seem too high. We sized our solar panels to cover our needs at 8.5kW. The additional $68/mo connection fee isn’t terrible but also isn’t much less than our electric bill without solar at $120/mo (usage not taxes). With cloudy days, pulling from grid could easily make the bill as much as or higher than before solar. There should be a fee, but it needs to be reasonable.
Solar Voltage Rise
Another problem with residential solar is the challenge of residential voltage rise. This is caused by the NEM ability to “sell back” power to the utility company. To push excess solar generated power back to the grid, the solar system must raise the voltage slightly higher than the grid voltage. This is generally fine as there is demand on the local grid for that power. However, as more and more homes in the neighbor add solar, all of those solar systems are trying to push their excess power back to the grid at the same time (morning to early afternoon during the sun’s brightest). As each system bumps the voltage to push the power onto the grid, you start to see the local grid voltage rise. I have seen nominal 220v jump to 224v in our area. At some point that voltage becomes too high and electronic equipment will start to fail. I’m sure the utility company has ways to deal with this, including sending frequency changes to signal solar inverters to stop production, but this would be added investment for them to accommodate solar.
Solar Duck Curve
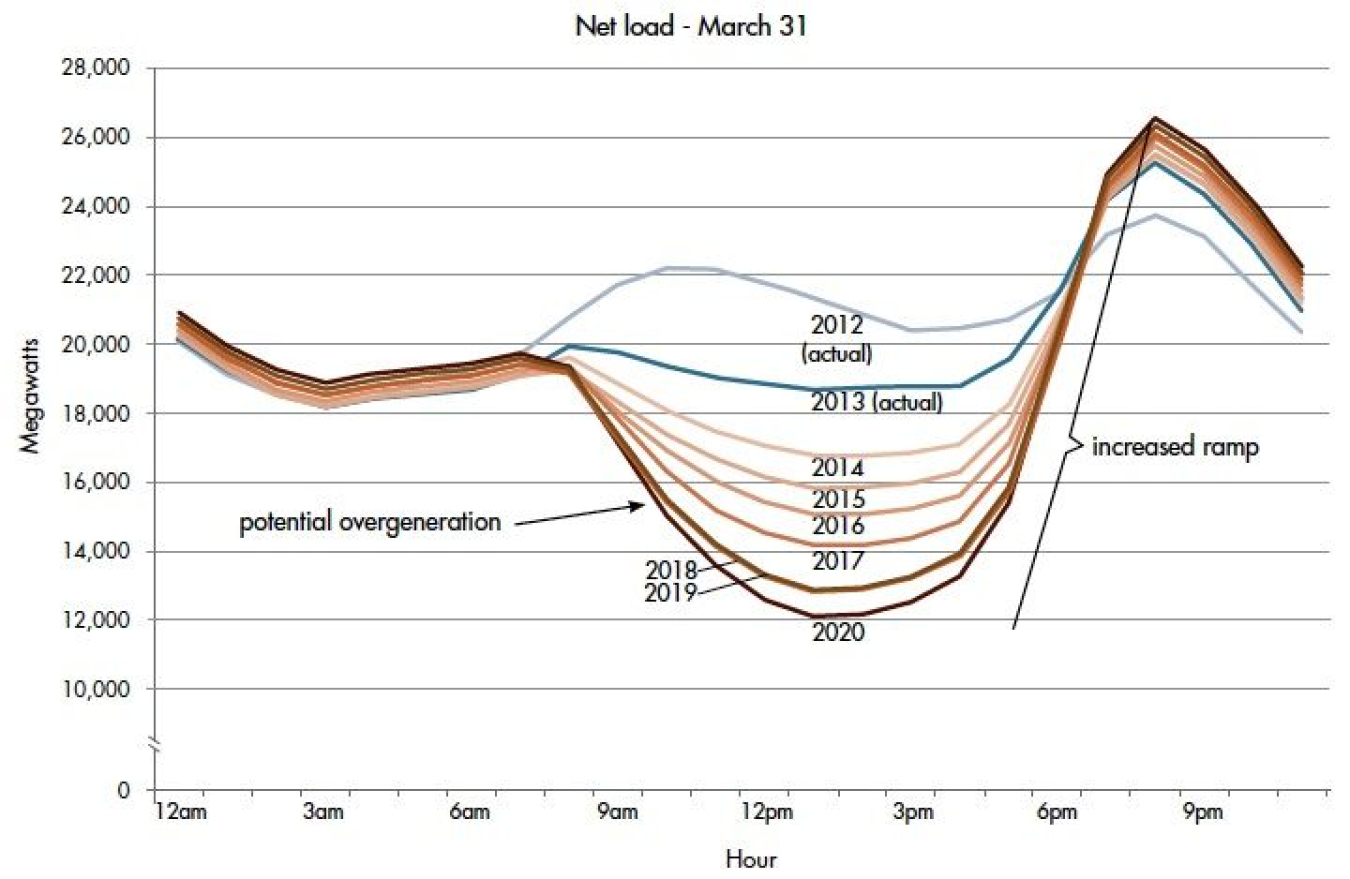
Even if solar voltage rise is managed, there is another problem. When the sun is out, the utility generation demand can drop significantly but then surges when the sun goes down. 4pm to 9pm happens to be the time of the greatest demand. It coincides with evening meal preparation, additional lighting and afterwork entertainment demands. This means that the demand pattern has changed and has created a challenge for utility companies to support. If you look at the demand curve before solar, it looked like a camel’s back, but now the “solar production” dip is so dramatic that it forms a massive and steep jump in the evening. That is difficult for the grid and for power generation to match. The new demand graph is called the solar duck curve due to the new shape (see https://www.energy.gov/eere/articles/confronting-duck-curve-how-address-over-generation-solar-energy).
Solar rise and the duck curve demand are caused by solar systems that can “sell back” their excess power. The solution is to have the excess power stored locally through energy storage devices (ESDs), basically, batteries like the Tesla Powerwall or similar solutions by Enphase or LG. That allows homes to switch to battery power in the afternoon and through the evening (especially 4pm-9pm when energy demand is highest). With local storage, the solar rise and the duck curve issues are mitigated. The problem is that except for the luxury of having whole-house power backup during power outages, there is no incentive to get an ESD to help shave the peak demands. A good approach by PUC could be to discourage “selling back” power to the utility company (especially during peak demand) and instead, encourage adding ESDs to storage the over production for later use.
Residential Solar Advantages
There are good advantages of residential solar. While I highlighted the downsides, I would be remiss not to point out some of the advantages that are not tied to financial benefit to the owner. For one, the distribution of power generation, putting it closer to the edge where the demand is being generated (homes), can help relieve the constantly growing demand on the electrical grid system. With ESDs, we can reduce the load on the grid which often must transmit power over greater distances to meet the rising demand loads. Local production of power helps.
Another benefit to local home generation is the greater awareness by homeowner of their energy footprint. By having a home based solar system with a battery (ESD) and easy tools to monitor usage, the the homeowner becomes very conscious of how much energy is being used, and wasted. We began to optimize our usage of devices to reduce the demand or align it to the time when we have the most energy production. It is a game and I know this can be subjective but it is also a powerful learning opportunity that I believe can help us optimize for a greener future.
Conclusion
We need to encourage renewable energy generation and storage at the edge, where it is being used. At the same time we need to ensure funding for a resilient power grid without placing undue burden on lower income families. There are other renewable energy options, but I also believe we should exploit the fusion power that shows up each day in our sky (our local sun), as much as possible. It’s incredible how much power is available to us every day in the sky and our technology is just beginning to tap it. More efficient solar cells and higher capacity batteries are on the horizon (no pun intended). The future of sustainable and environmentally friendly energy is bright, we just need the courage to pursue it.
“Feedback is the breakfast of champions. – Ken Blanchard
The Beijing 2022 Winter Olympics is on! My wife absolutely loves watching skating, hockey and curling. She is glued to the television when any of these come on. I’ve never been a sports fan of any kind and regularly embarrass my wife and son when I try to talk about any sports. But I do find the Olympics fascinating. What impresses me is the level of skill that these Olympians achieve. I watch the competitions and I’m blown away at how anyone can assess the minute differences between these top-notch athletes. They are clearly at the top of their game. Just being there is an accomplishment. They are the best of the best. Yet to them, the goal is to still be even better, at least better than their competition and earn the gold medal.
I’m not competitive by nature, but I recognize the power of the rival. Having someone you compete with can make you better. You try harder. You take necessary risks. You stretch outside of your own comfort zone and go beyond yourself. You improve. Your opponent can be a trainer, a friend, a family member or even your own shadow. You try to step ahead of where they are, envisioning, enduring and exceeding. You push through obstacles that were limiting you and you level up. Your rival does the same. It’s a virtuous improvement loop, constantly taunting you to keep going, try harder, be better.
Who is your rival? Who challenges you to be better? A good rival is not necessarily an enemy. In fact, the best rival can be a friend who gives you the gift of honest feedback. It can be that mentor who encourages you to use your strengths and challenges you to overcome your weaknesses. You can even be your own rival. Challenge yourself. Do honest self-reviews and grade your own performance. I often find my biggest critic stares back at me in the mirror every morning. It is a gift you can give yourself. And it’s good to have someone else who can be real with you and provide honest feedback. If you don’t have that, be proactive and ask for it.
Are you a good rival for someone else? Do you give honest feedback? I confess, I default to encouraging with kindness over pointing out flaws. But providing others with candid and sincere insight is also a gift. It is a form of encouragement and love, if delivered in the right way. Be kind. Give feedback. It’s an improvement area that I seek for myself and encourage you to do the same.
What am I or we doing wrong? What can I or we do better? Many on my team are not shy in giving me answers. Thank you for that! I invite all of you to do the same and ask those same questions. We all get better when we know what we can improve. Embrace the challenge and be a friendly rival too.
Rivals in Business
The virtue of having a rival in our life to be better also applies to business. Our companies need rivals. Just like personal rivals, corporate rivals force businesses to try harder. They must invest and take necessary risks or they become obsolete. They stretch outside of their own operational comfort zones, reinvent themselves and enter new markets. They must improve their ways of working and deliver their products and services with higher quality, efficiency, speed, and relevance. Yes, competition is a threat to a business’s survival. But it’s the existence of that threat that keeps the business alive, innovating, adapting and improving. Embrace competition as a healthy rival… and win.
Now back to the winter Olympics, curling… and Nathan Chen.
“Everything has beauty, but not everyone sees it.” – Confucius
Prochlorococcus. Try saying that ten times fast! Prochlorococcus is the smallest photosynthetic organism on Earth. This microscopic phytoplankton measures a mere 0.6 μm (0.0006 mm) but is the most abundant photosynthetic organism on Earth. Without any ability to move, this faithful little bacterium spends all its time floating around in our oceans absorbing the warm rays from our sun and converting that energy into oxygen. Scientist estimate that this unseen creature is responsible for producing 20% of all the oxygen in our global biosphere. That’s more than all of the tropical rainforest combined! Take four breaths. Now take one more. That last one was oxygenated for you by your friendly neighborhood Prochlorococcus.
Isn’t life on our planet amazing? All around us are tiny wonder, fellow creatures, seen and unseen that are playing out this incredible symphony of life. That includes us! Do you sometimes feel invisible? Insignificant? Maybe it seems that what you are doing doesn’t amount to much. If so, look to the Prochlorococcus. That little fellow can’t even be seen with the naked eye! Talk about invisible. Yet this brilliant little guy is responsible for helping sustain life across our incredible planet. So are you. No matter how small it may seem, your actions add up. And not your actions only, but those of others around you too.
It’s easy to pass by and miss the beauty, the story and the miracle that is happening right before us. People and fellow creatures all around us are going about their business, making oxygen for their friends, their families and the world. We are part of that. I don’t know about you, but I often find myself buried in my screen, my projects or my worries. I lock myself away in my own mental prison, completely oblivious to the spectacular wonder that is going on all around us. Look up. Step outside of your zone and breathe in. Look for the beauty and priceless wonders that are all around us. Appreciate those around you, doing their job, making a difference too. Soak in those golden moments and exhale. It’s good to be alive!
Thanks for all you do! Your kindness, thoughtfulness and deliberate efforts are how we keep moving forward as a human family. And even when your work may seem invisible like our Prochlorococcus friends, remember, the work you do can make a global difference. Look up from the screen. If you can, go on a walk and breathe in the amazing life around you. Those moments are like oxygen to the soul and ultimately make us better at what we do. Take some time today to appreciate the tiny wonders of our world and the incredible life we have been given.