Digital Scale for 3D Printer Filament

This project is to add a load cell to the filament spool holder of a Creality Ender 3 Pro 3D-printer to measure and display weight of spool. Using the tare function of the scale on an empty spool, the user can determine the amount of filament (in grams) remaining on a spool.

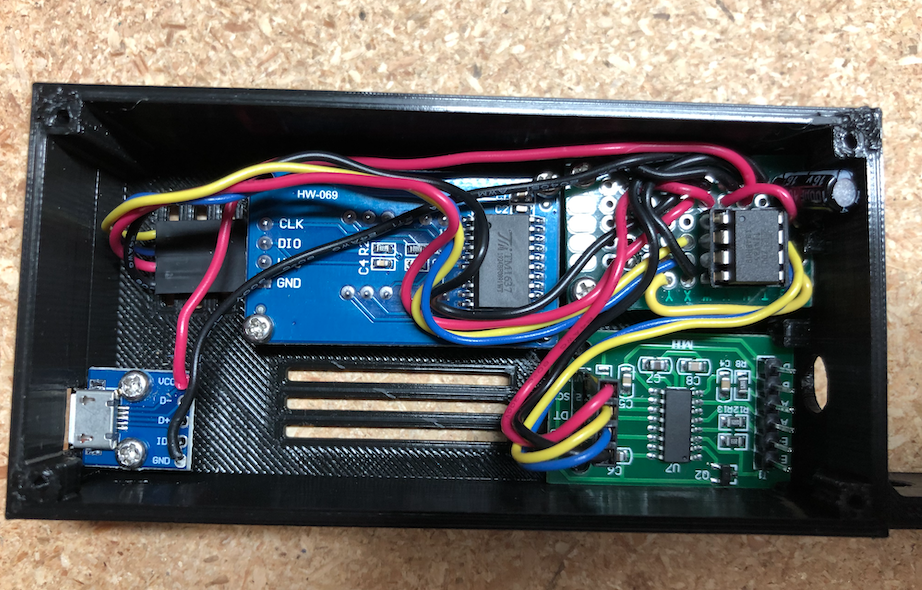
This project uses an Arduino or ATtiny85 microcontroller with the HX711 load cell module for weight measurement and a TM1637 4-digit LED display. Project GitHub Link

Components

  • ATiny85 Microcontroller (DigiKey)
  • TM1637 4 Digit Segment LED Display (Amazon)
  • Load Cell with HX711 Load Cell Amplifier (Amazon)
  • 100uF Electrolytic Capacitor
  • 5V Power Supply – Micro USB to DIP 5-Pin Pinboard (Amazon)

Schematic

Schematic

How to Build

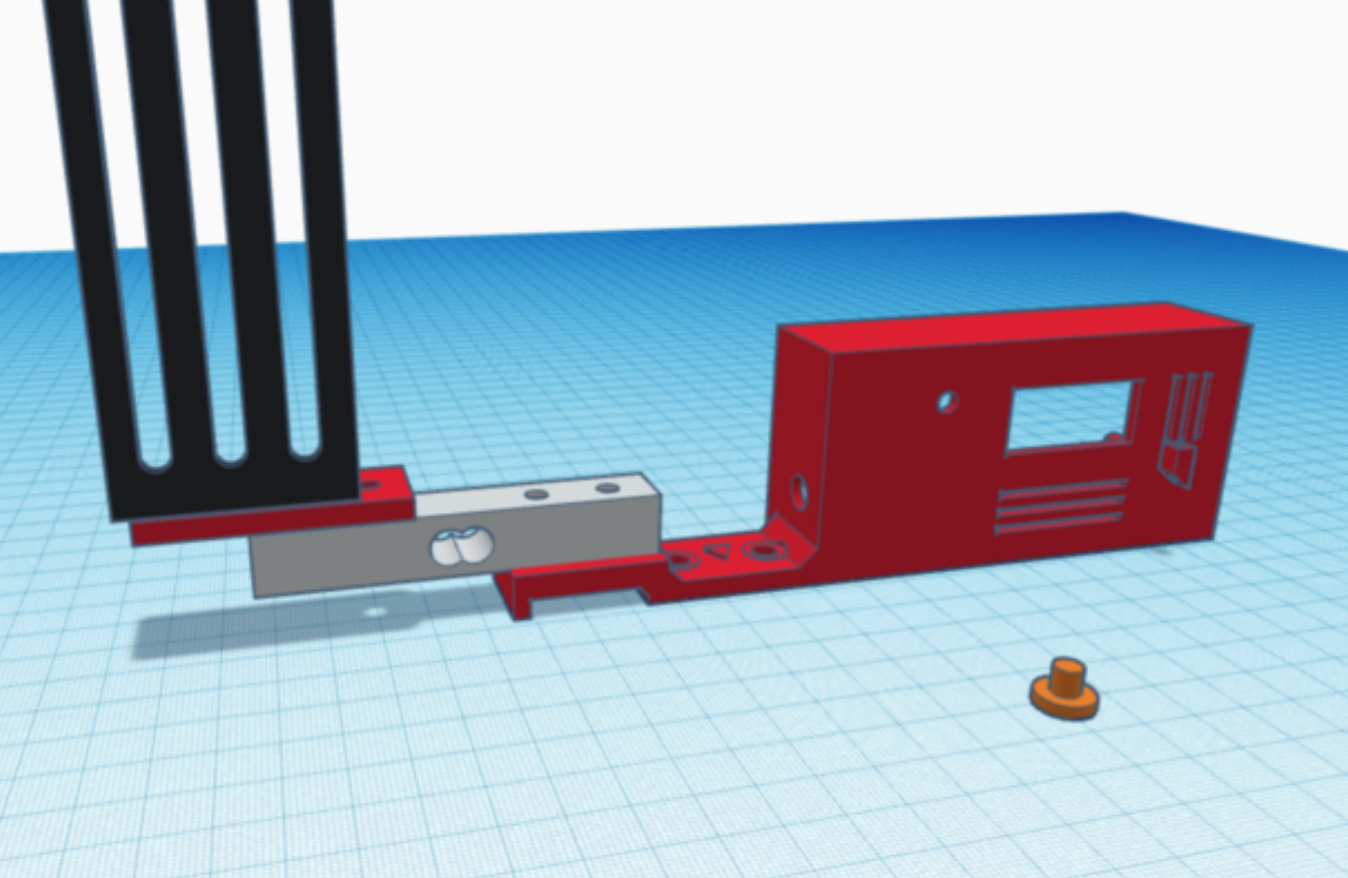
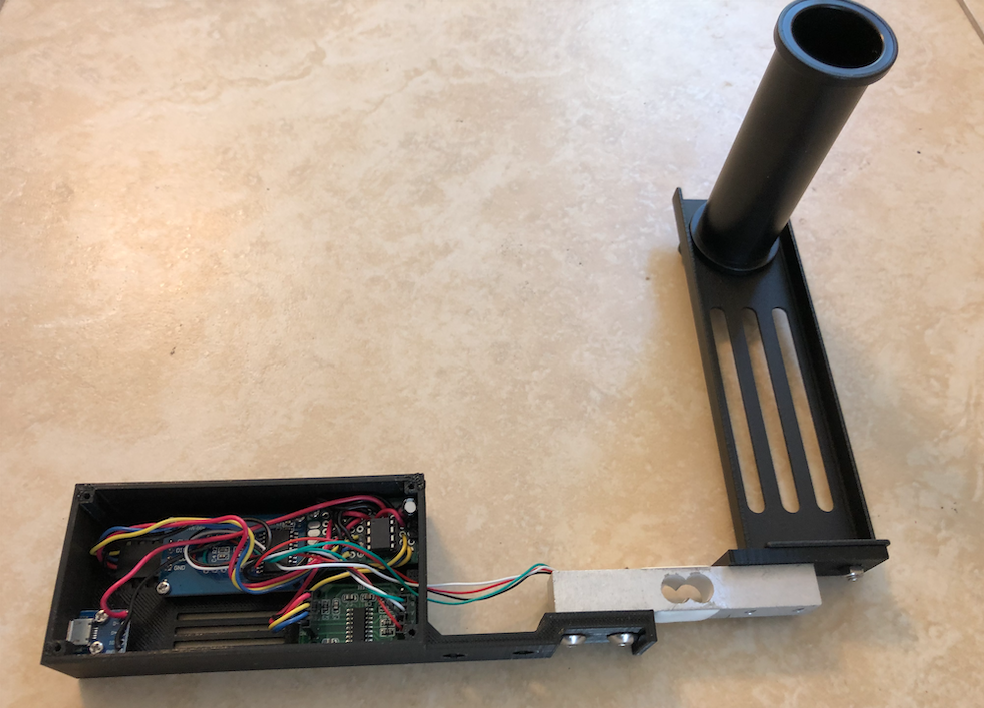
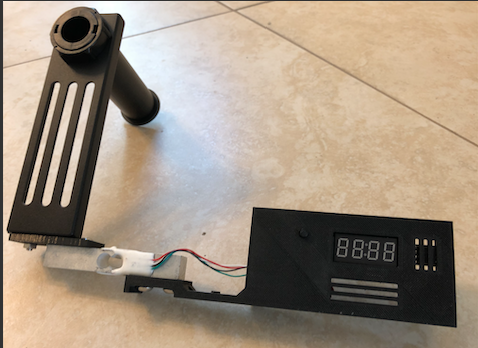
The filament scale mounts on top of the Ender 3 top rail where the filament spool is located. You will need to print the load cell mount and the LED display box. This is available on Thingiverse or Tinkercad. See example build pictures below.

Setup & Calibration

Download the Arduino code here: https://github.com/jasonacox/Ender3-Filament-Digital-Scale

This sketch requires that you calibrate the load cell. This involves the following steps:

  1. Run the sketch with DEBUG true (using a Arduino Uno or other microcontroller with serial)
  2. Record the “HX711 reading” values with NO load on the scale – this is your “CAL_OFFSET
  3. Use an trusted scale and weigh an object (grams or kg) – record this value as your “KNOWN-VALUE
  4. Place the object on the load cell and record the “HX711 reading” – this is “CAL_VALUE
  5. Compute the CAL_RATIO = (CAL_VALUECAL_OFFSET) / KNOWN-VALUE
  6. Edit the #defines in the code
    CAL_OFFSET  = -148550
    KNOWN_VALUE =  382.7186 g
    CAL_VALUE   = -107150
    CAL_RATIO   = (CAL_VALUE - CAL_OFFSET) / KNOWN_VALUE
    CAL_RATIO   = ((-107150) - (-148550 )) / (382.7186)
    CAL_RATIO   = 108.17

Programming Notes

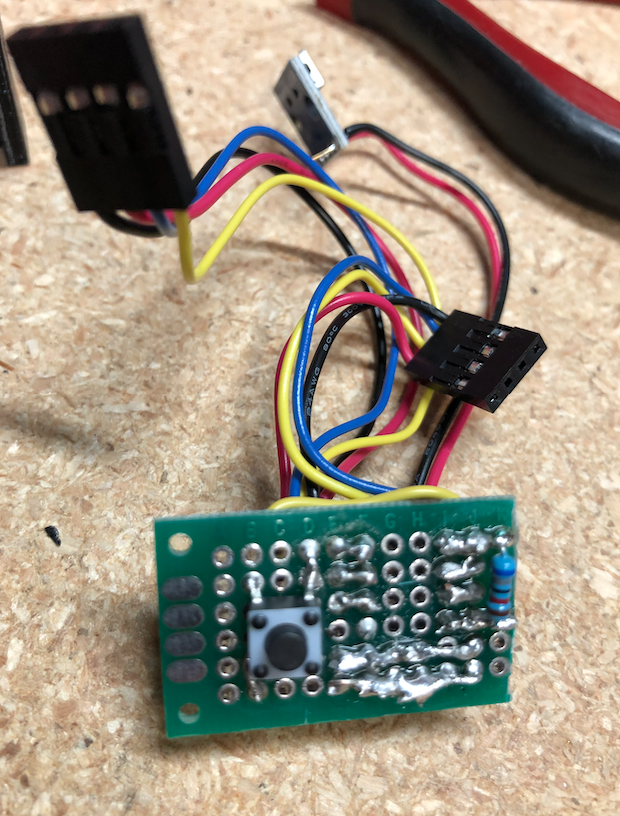
The TARE button uses PB0. If you use the Tiny AVR Programmer from Sparkfun it drives an LED on PB0 and once the sketch is uploaded, the ATTiny will read PB0 as LOW and assume you wish to TARE the scale. You will need to remove the the chip from the programmer after uploading to get it to work correctly in the circuit.

Tare Function

On start the circuit will read the last TARE value from EEPROM and display the the current weight. Press and hold the TARE button and the current weight value will be recorded in EEPROM and subtracted from the current reading to “Zero” out the scale.

Assembly

The 3D model for the case and load cell mount is on Tinkercad and available for download on Thingiverse. The case is open-back for simplicity and it has mounting holes that use the existing spool bolts and fasteners.

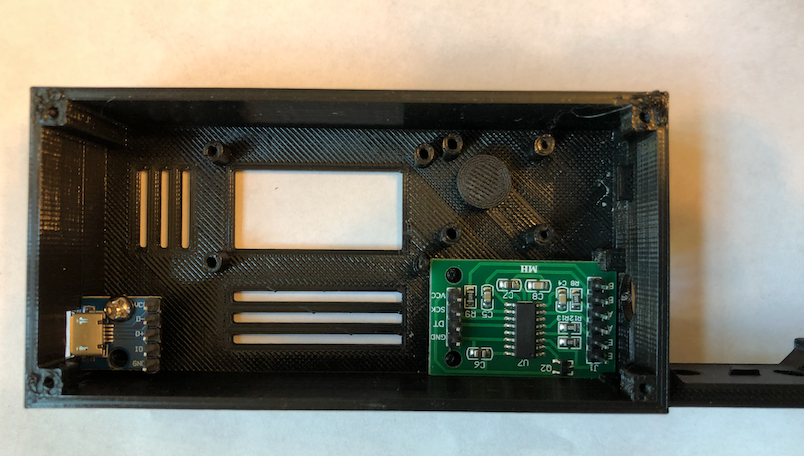
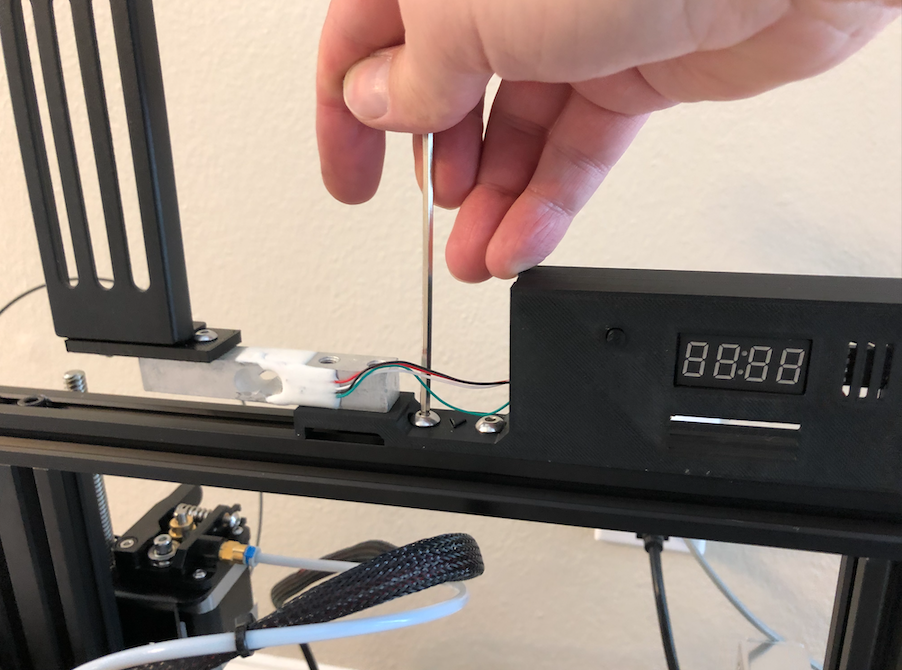
I used a small 20mm wide project circuit board to mount the ATtiny85 socket, resistor, electrolytic capacitor and microswitch. The microswitch is located on the bottom and will face the hole on the front of case. A circular 3D printed button will fit in the hole and press against the microswitch to activate the TARE function.

The case is designed to hold a USB plugin board, the TM1637 display, the controller board and the HX711 load cell module. The HX711 slides in with a hole on the side to feed the load cell wires.

You will need M5 bolts to mount the load cell onto the 3D printed case bracket (see pictures below) with bolts going up into the threaded load cell holes. The filament spool holder that came with the Ender 3 Pro will attach to the “load” end of the load cell (the end marked with the down arrow and max weight). A 3D printed shim adapter will go between the filament holder and the load cell. An M4 bolt will go down and tighten into the load cell. The other M4 bolt will need a M4 nut under the shim.

Attach the scale and filament holder back on to the top of the Ender 3 Pro using the two M5 bolts and M5 T-nuts that came with the printer.

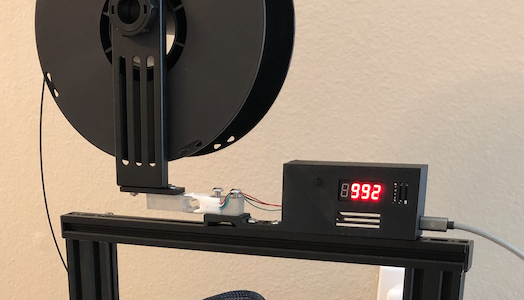
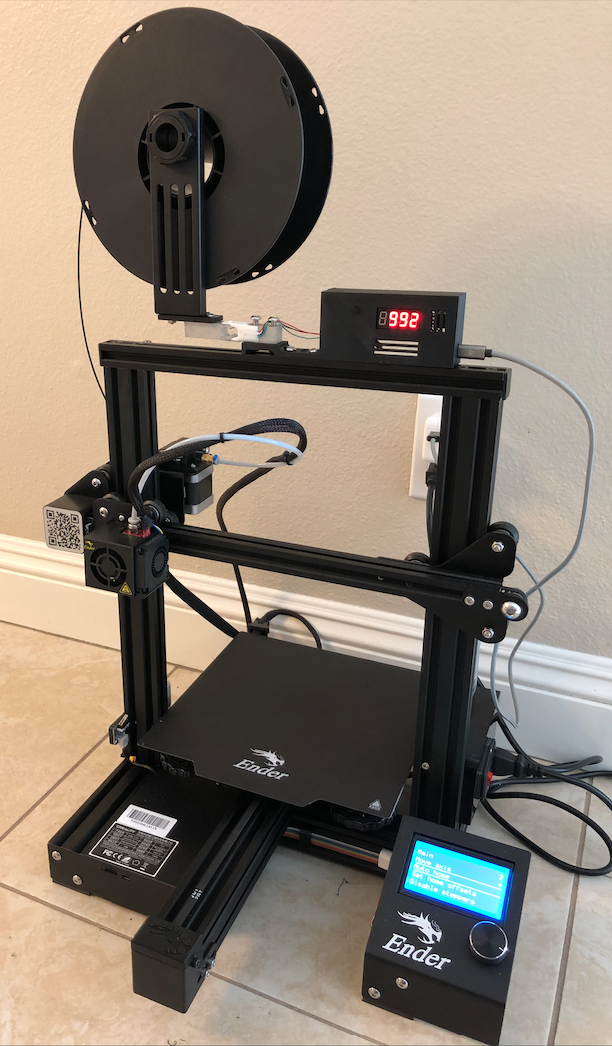
Plug in the scale and put an empty filament spool on the holder. Press the TARE button to zero out the weight (it records this TARE value in EEPROM memory so it remembers it on power cycle – you shouldn’t have to use TARE again). Now replace the empty spool with one with filament. It will now show you the estimated amount of filament remaining. it has been surprising accurate for my project. Notice the example below shows a slightly used 1kg spool is reading 992 grams.

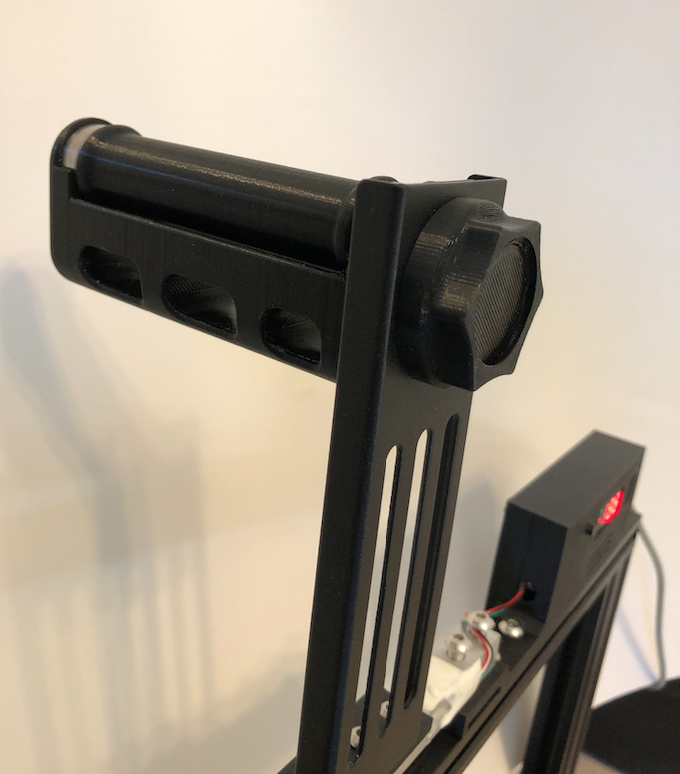
Optional Roller Addition

I immediately noticed that when printing, as the extruder stepper pulls the filament, the weight will change, reflecting the dynamic force of the pull and the sliding friction resistance of the static spool holder rod.

I decided to addd a real roller to the spool holder so I printed this model that uses two bearings to remove friction: https://www.thingiverse.com/thing:3209211

References

DevOps Enterprise Summit 2014

I had the privilege of speaking at the first annual DevOps Enterprise Summit.

Jason Cox - DOES 2014DevOps Enterprise | The Agile, Continuous Delivery and DevOps Transformation Summit http://devopsenterprise.io

Wired Magazine – Web Insights
DevOps Innovation Takes Place in the Enterprise by Steve Brodie

Redhat Developer Blog
DevOps Enterprise Conference — Day One

Electric-Cloud
DevOps Enterprise Summit Puts Agile Transformation Front and Center
What we learned at DevOps Enterprise Summit 2014

Software Development Times
DevOps Enterprise Summit bashes silos

PuppetLabs Blog
Disney’s DevOps Journey: A DevOps Enterprise Summit Reprise

Tweets
http://seen.co/event/devops-enterprise-the-agile-continuous-delivery-and-devops-transformation-summit-san-francisco-airport-marriott-waterfront-2014-949/highlight/38769

Selection of quotes:

  • “You’ve got to pick technology that transforms. You need to find tools that change the way you think.” – Jason Cox from Disney
  • “It’s all about the people! We have to empower the edge.” – Jason Cox from Disney at #DOES14
  • #DOES14 Jason Cox of Disney: Remove waste. (Motion != Work)
  • Jason Cox #DevOps guy at @disney promotes positive rebellion. Red tape removers! #DOES14
  • “DevOps professionals must be courageous. They must have the candor to say that there are issues and be renegades enough to constantly challenge the status quo.” – Jason Cox


Creativity, Inc.

creativity-incCreativity, Inc.: Overcoming the Unseen Forces That Stand in the Way of True Inspiration Hardcover

by Ed Catmull and Amy Wallace


The Phoenix Project

phoenixprojectThe Phoenix Project: A Novel about IT, DevOps, and Helping Your Business Win

by Gene Kim, Kevin Behr, & George Spafford

Digital transformation has lit a fire that is burning through traditional IT shops across the world telling us to adapt or be reduced to the ash heap of obsolescence. The Phoenix Project grapples with this disruptive change by telling an engaging story about an IT manager who is thrust into this fiery turmoil.  The main character is ushered unwillingly and unprepared into a new leadership role where he uncovers the complex and unrelenting problems any IT shop knows all too well.  Fair warning: If you have any history working in, leading or managing IT teams, you will likely have a visceral reaction to the narrative and even suspect the authors were spying on your organization.  But there is hope!  The main character in the story finds enlightenment and begins to implement changes based on the “Three Ways” discussed in this book that ultimately transforms the teams, balances life for the employees and successfully propels the business forward.

IT leaders will find the narrative and advice relevant, potent and inspiring.  By applying the principles learned in this novel, your technology organization, like the phoenix of old, can rise from the ashes to take on the challenges of our new Digital age.


There is hope!  Technology workers and leaders will find the narrative and advice woven throughout The Phoenix Project, relevant, visceral, potent and inspiring.  By applying the principles learned in this novel, business and technology leaders will see how they can transform their own organizations, identify and break down unnecessary silos, improve life for technology workers, and successfully propel their businesses forward in this new Digital age.


Management Lessons From a Controversial Genius

leadingappleLeading Apple With Steve Jobs: Management Lessons From a Controversial Genius

by Jay Elliot

I happend to find this book while surfing through my Safari Online account.  This is a great perspective from someone who worked alongside Steve Jobs and experienced his leadership style and philosophy.

There are several great Quotes from Steve Jobs in this book and Jay uses some of the best as chapter leads:

  • I have looked in the mirror every morning and asked myself: “If today were the last day of my life, would I want to do what I am about to do today?” And whenever the answer has been “No” for too many days in a row, I know I need to change something. [Chapter 1]
  • Being the richest man in the cemetery doesn’t matter to me. Going to bed at night saying we’ve done something wonderful, that’s what matters to me. [Chapter 2]
  • A lot of people in our industry haven’t had very diverse experiences. So they don’t have enough dots to connect, and they end up with very linear solutions without a broad perspective on the problem. The broader one’s understanding of the human experience, the better design we will have. [Chapter 3]
  • A small team of A-players can run circles around a giant team of B- and C-players. [Chapter 4]
  • It’s building an environment that makes people feel they are surrounded by equally talented people and their work is bigger than they are. The feeling that the work will have tremendous influence and is part of a strong, clear vision. [Chapter 6]
  • We used to dream about this stuff. Now we get to build it. It’s pretty great. [Chapter 7]
  • Design is the fundamental soul of a man-made creation that ends up expressing itself in successive outer layers of the product or service. The iMac is not just the color or translucence or the shape of the shell. The essence of the iMac is to be the finest possible consumer computer in which each element plays together. [Chapter 8]
  • My job is to not be easy on people. My job is to take the great people we have and to push them and make them even better, coming up with more aggressive visions of how it could be. . . . My job is to make the whole executive team good enough to be successors, so that’s what I try to do. [Chapter 9]
  • You can’t talk about profit; you have to talk about emotional experiences. [Chapter 10]
  • I’m actually as proud of many of the things we haven’t done as the things we have done. [Chapter 11]
  • We don’t know where it will lead. We just know there’s something much bigger than any of us here. [Chapter 13]
  • It’s not just a job, it’s a journey. Let’s never forget that. . . . Your customers dream of a happier and better life. Don’t move products. Instead, enrich lives. [Chapter 14]

Lessons I picked up from this Book:

1. Think Different

Here’s to the crazy ones, the misfits, the rebels, the troublemakers, the round pegs in the square holes . . . because the ones who are crazy enough to think that they can change the world, are the ones who do. -Apple Ad

It’s important not to settle into a stagnant mechanical state.  Be the one to change things.  Create constructive discomfort and challenge the status quo.  When starting on work for the Mac, Steve wanted to create a team of “Pirates, not the Navy”.  In Chapter 4, Jay says:

You want people who dare to be different! You want Pirates—where the skull and crossbones may not be part of the company’s symbol, but they’re Pirates nonetheless. People who take risks, live at times a little on the edge, flaunt rules when justified, laugh loudly as the wind lashes their face and their pursuers fade from view into the distance behind. I always want to work with people like this, and so should you. 

Whether you think of them as nonconformists, dissenters, rebels, pirates, nutters, positive deviants, or as Blair’s crazies, make sure your team has a solid sprinkling of them. They will challenge your thinking, fuel your ideas, pump up your momentum, boost your competitive edge, and quite simply make your business a winner. And make sure you yourself provide a dose of this magic on occasion. You’re unlikely to accomplish anything great in your career without it.


One of the things that happens in organizations as well as with people is that they settle into ways of looking at the world and become satisfied with things. And the world changes and keeps evolving and new potential arises but these people who are settled in don’t see it. – Steve Jobs

2. Stay Focused on the Product

Product, not Profit or Process:  Businesses usual start out focused on product, their great idea to change the world.  The tendency is slip from product to profit and process focus.  Steve and others like him (Walt Disney included) spent all their energy thinking about making something great, not making a great profit.  As we have seen, those that keep that product perspective often end up with healthy profits as well.

Design with the customer in mind:  Steve drove product design by keeping the end user in mind, not just surface usage, but emotional connection as well.

You can’t talk about profit; you have to talk about emotional experiences. – Steve Jobs

Design for excellence.  Design to create an emotional experience, not just utility.  No more crap products.

In chapter 7, Jay says:

The reason for the outpouring of emotion around the world at the time of Steve’s death was that his products had touched people emotionally. Money and profits were never the motivators for Steve. His motivation was, “I’m going to build a product for myself, a product that will fill a need and at the same time give me pleasure to use.

It’s not just a job, it’s a journey. Let’s never forget that. . . . Your customers dream of a happier and better life. Don’t move products. Instead, enrich lives. – Steve Jobs

steve jobs

Raspberry Pi – AirPiano

Wouldn’t it be cool if you could control your MIDI equipped digital piano from your iPhone?  Imagine a player piano capable of jukebox queuing up MIDI or Audio files and playing them in order.  That was my goal!  RPI to the rescue.

RaspiModelB

Required Ingredients:

  • Raspberry Pi – Model B, 512MB RAM, 16GB SD Card, Raspbian Linux, Apple 12W USB Power Adapter, USB WiFi Dongle
  • USB MIDI Digital Device (e.g. Yamaha Clavinova CLP-440 with USB MIDI port and RCA L+R Audio Inputs)
  • Software:  Apache HTTP Server, PHP, MySQL, (Nice to have:  Netatalk file server, Shairport AirPlay server)

Instructions:

My original thought was to turn the Yamaha speakers into a AirPlay device for our many iOS devices.  It’s nice to pipe in background tunes without having to hook up a device.  AirPlay is great way to do that but I didn’t want to spend $100+ to be able to do that.  The Raspberry Pi is more than capable of doing this. I found an extremely helpful blog post here:  http://www.raywenderlich.com/44918/raspberry-pi-airplay-tutorial

NOTE: Power is a big issue for the Raspberry Pi.  If you are using a WiFi dongle or any other USB device, I recommend making sure your power supply has enough kick to keep the RPI going.   I started out with a microUSB adapter that advertised 700mA but performance became very unstable, especially under load.  I switched to a 12W Apple adapter that I had handy and the problems disappeared.   The RPI FAQ recommends 1.2A (1200mA).

Setup for AirPiano – MIDI Control

The Project Code: https://github.com/jasonacox/raspberrypi

  • MySQL: Database ‘piano’ – see piano.sql file
  • Dequeue Service: Run the cron.sh script to have the RPI scan for new midi or wave files to play. Run it with:
bash -x cron.sh 0<&- 1>/dev/null 2>/dev/null &
  • Apache: Install apache http with mod_php and mysql support
  • Website Code: Install index.php, setup.php and the folder.png files into the document root of your webserver. Upload the MIDI (*.mid) and WAVE (*.wav) files to this location. Be sure to update $globalBase in setup.php to the folder where these files are located.


AirPlay via Raspberry Pi

Adam Burkepile has the best tutorial I’ve found on how to set up a RPI for AirPlay:

http://www.raywenderlich.com/44918/raspberry-pi-airplay-tutorial

Apple Share (AFP) Server via Raspberry Pi

The RPI is great for a tiny file server!  At the least, having it run an AFP server will allow quick drag and drop transfer from your Macs.  A Samba service for Windows shares is easy to set up as well.

sudo apt-get install netatalk

Yes, it is that easy.  Finder will now show your Raspberry Pi under “shared” along with any other local network shares:

Screen Shot 2013-12-27 at 11.22.08 PM


iCurlHTTP – cURL for iPhone and iPad

iCurlHTTP

HTTP Server Response Diagnostic Tool

I love cURL.  Systems engineers, developers, administrators, QA engineers and web operations specialist everywhere have used the curl tool to help troubleshoot web server responses.  It gives a quick view into exactly what is being sent from a web server to a browser.

On a commute home from work I started to think how handy it would be if the small computer I was holding, my iPhone, had a simple to use app like curl to do the same troubleshooting.  I always wanted to write my own iPhone app so I started researching how I could do that.

My Xcode Adventure

I fired up Xcode on my Snow Leopard equipped MacBook Pro for the first time.  I found a few great iOS development books on SafariOnline and started learning Objective-C.  After a few chapters I started going off the page and adding views and controllers.  I wanted to deploy my test apps to my iPhone so that required that I sign up as an Apple Developer (and $100!).  I soon discovered that my Xcode version was too out of date to work with my iOS 6.1 devices so I attempted to upgrade, only to discover that I needed to upgrade my OS.   Now on to Xcode 4.6 and suddenly my projects were running on my iPhone and iPad.

My libcurl Adventure

I discovered the NSURL class and started trying to get raw responses from web servers to display to the textview.  It was too digested and would require a lot of effort to simulate a raw curl session.  I started looking at the NSStream class when a friend suggested that I investigate a precompiled version of libcurl (the cURL library from Daniel Stenberg) for the ARM processor.  Instead, I found a great post by Nick Zitzmann where he shows how he compiled libcurl and even provides a binary: http://seiryu.home.comcast.net/~seiryu/libcurl-ios.html

I managed to get the latest version of libcurl to compile and also included the Apple SecureTransport library (–with-darwinsll in libcurl config):

#!/bin/bash
cd curl-7.29.0
export IPHONEOS_DEPLOYMENT_TARGET="4.3"
export CC="/Applications/Xcode.app/Contents/Developer/Platforms/iPhoneOS.platform/Developer/usr/bin/llvm-gcc-4.2"
export CFLAGS="-arch armv7 -arch armv7s -pipe -Os -gdwarf-2 -isysroot /Applications/Xcode.app/Contents/Developer/Platforms/iPhoneOS.platform/Developer/SDKs/iPhoneOS6.1.sdk"
export LDFLAGS="-arch armv7 -arch armv7s -isysroot /Applications/Xcode.app/Contents/Developer/Platforms/iPhoneOS.platform/Developer/SDKs/iPhoneOS6.1.sdk"
./configure --disable-shared --enable-static --with-darwinssl --disable-dependency-tracking --host="armv7-apple-darwin" --prefix=~/Code/curl/device
make -j `sysctl -n hw.logicalcpu_max`
make install

I added the libcurl.a library to my Xcode project and started using the easy interface API via CURLcode curl_easy_perform(CURL * handle ). The realtime feel of iCurlHTTP comes from the use of the CURLOPT_WRITEFUNCTION option to push realtime code into a view controller method that renders to the textview object. It required  periodically having the thread give up time to the mainRunLoop (via message to NSRunLoop) in order to allow the display to render and respond to user events.

iCurlHTTP v1.0 Born

iCurlHTTP was born.  It was a simple, easy to use iOS app that allowed you to run simple cURL like tests, simulating different web browsers to retrive the raw HTTP headers and HTML response from the web servers.

icurlhttp-v1.0

OpenSSL Anyone?  iCurlHTTP v1.1

The SecureTransport library works great but provided less details on SSL connections than what I was accustomed to seeing with curl.  I wanted more x509 decoded information, specifcially SSL certificate details about expiration date.  The OpenSSL library would allow for this so I began another search to get  OpenSSL library for ARM7.  To get what I wanted, I cross-compiled both OpenSSL and libcurl together. With that I was able to get the great openssl detail in the output, including cert info:

icurlhttp-cert

I managed to cross compile libcurl and openssl separately for armv7, armv7s and i386 architectures but later found a great GitHub project script created by Miyabi Kazamatsuri that does both.  I forked his code and updated it to work with Xcode 5 (clang for iPhoneOS and iPhoneSimulator) and added the 64-bit arm64 and x86_64 architectures.  The script is available on my GitHub:  https://github.com/jasonacox/cURL-SSL-for-iOS

UPDATE: I later put together a much better build script for openssl+libcurl that creates libraries for Mac, iOS and tvOS (Apple TV) targets: https://github.com/jasonacox/Build-OpenSSL-cURL

HTTP Timing and iOS 7 support added to iCurlHTTP v1.2

Curl has the ability to provide timing data for DNS lookup, TCP Connect, SSL Handshake, First Byte and Total time.  For example…

curl -k -s -o /dev/null -w '%{time_namelookup} %{time_connect} %{time_appconnect} %{time_pretransfer} %{time_redirect} %{time_starttransfer} %{time_total}n' https://jasonacox.com

I wanted to add this to iCurlHTTP to give a mobile perspective on these numbers.  In v1.2, I added this in the detail response view and as timing data points listed along the bottom of the UI.

icurlhttp-timing3

The v1.2 version also includes the iOS 7 SDK updates and the new minimalist UI look and feel.

iCurlHTTP 1.3 Wish List 

Thanks to great feedback, I captured several feature requests from the iCurlHTTP user base that became the goal for version 1.3:

  1. Custom Headers – Allow more and customized browser emulations via a customized option.
  2. Print, Copy or Email Output – Add a one-button feature to send the output to the clipboard, printer, email, post, etc.
  3. Customized Post – Allow customized post data to simulate a POST form submit.

This meant I needed to be able to have a User Settings pop-up screen to allow users to enter custom fields for headers and posts.  I also wanted to allow the ability to have a custom user-agent, http authentication (user/password), SSL options and possibly others in the future.

I knew I wanted a table based form to allow for formatting, scrolling and auto-positioning.  I considered using the Settings bundle but I needed multi-line UITextView input (especially for custom headers).  There are several great open source solutions  but my favorite version was FXForms, written by Nick Lockwood  (https://github.com/jasonacox/FXForms).  I used a simple plist for settings persistence.

icurlhttp-settings

The following features are added in version 1.3:

  • Share Feature – Send output to Clipboard, Printer and Email
  • User Settings – Set Custom User-Agent, Custom Headers (replace defaults or add new ones), POST Data, Authentication and SSL Mode selection
  • Updates – New libcurl and openssl libraries.

iCurlHTTP 1.4 Enhanced History

The goal of the 1.4 update was to enhance the URL dropdown history by adding HEADER and POST data for easy repeated testing.  I used simple (h) and (p) symbols to denote header and post respectively:

Screen Shot 2016-03-05 at 8.53.39 AM

iCurlHTTP 1.5 Redirect

I had several requests to add a “follow redirect” features (similar to curl -L command) to make it easier for users to test.  I didn’t want this to be purely  automatic because it would defeat the purpose of the granular detail that cURL provides so I present the user with a popup dialog when a 301 or 302 redirect response is received and list the redirection URL they can follow.  In this version, I also replace the ugly text “User” (settings) and “Share” buttons with the well known icons to help make it more intuitive.

Screen Shot 2016-03-05 at 9.30.53 AM

I’m amazed at how this small and simple project continues to grow (both in users as well as feature requests).  It has been a fun adventure! I frequently recommend other try building their own apps.  iCurlHTTP is written in Objective-C but I would definitely recommend trying out Swift.  I’m in the process of porting iCurlHTTP to the Apple TV (seems ridiculous, I know but I have to do it just for fun) and hope to try my hand at Swift.

iCurlHTTP 1.6 & 1.7 – HTTP/2.0 and IPv6 Update

For those wanting the libcurl, openssl and nghttp2 (HTTP2) libraries for iOS or tvOS (AppleTV), I have posted a build script on github: https://github.com/jasonacox/Build-OpenSSL-cURL

Thanks to request from users, I added the following features:

  • Certificate Chain Details for HTTPS Sessions (Detail Mode)
  • Support for Authentication Credentials in URL (e.g. https://user:pass@jasonacox.com/gettest.php)
  • DNS Resolve Spoof Option for Manual Address Resolution (eg. HOST:PORT:ADDRESS)

iCurlHTTP 1.8 & 1.9 – Performance Improvements

  • Performance Improvements and Reported Bug Fixes
  • Added user defined DNS lookup & connection timeout setting (default 5s)

THANK YOU!

Thanks for your great feedback and support!  I really appreciate the kind words and critical advice.  Please send more!

iCurlHTTP Website:  www.jasonacox.com/icurlhttp

Download on the App Store


Reference and Thanks!


Yamaha Clavinova CLP-440

I wanted a music workstation synthesizer and my wife wanted a real acoustic piano that looks like beautiful furniture.  We compromised by getting the Yamaha Clavinova CLP-440.  It looks, sounds and feels like a real piano with enough tech (MIDI, USB, voices) to make a armchair techy musician like me happy.  The PDF documentation covers most of the details you will need to start using the nice features, but there are a few things lacking so I’ll record some of my discoveries in this post.

USB Files

The piano has a USB port that will easily accommodate a thumb drive or external hard drive.  It stores and reads MIDI and WAV files.

Files created by the Clavinova will be stored in the “User Files” folder with a name USERSONG??.MID for MIDI files and USERAUDIO??.WAV for Audio files saved from the Clavinova.  The ?? is the number of the song selected from the Clavinova LED interface.  Here is an example listing of files on the USB drive:

USB Host with iPad

I wanted to be able to use my iPad to link to the piano for added voices and sequencing.  There are several MIDI options available for the iPad, but since the CLP-440 has a USB host port, I was able to use an iPad camera kit (essentially an adapter to allow the iPad to view pictures from a SD card or USB camera).   The Apple version and third party version should work fine.  Using that, I found that several apps could see and control the CLP-440.

iPad Apps for the CLP-440

Searching the Apple iTunes store for app to work with the Clavinova wasn’t easy.  I’ll record a few good apps that I found.

GarageBand
http://itunes.apple.com/us/app/garageband/id408709785?mt=8 – This $5 app from Apple is amazing on its own but it works great with MIDI from the Clavinova.

Midi Monitor
http://iosmidi.com/apps/midi-monitor/ – This app shows the iPad connecting to the Clavinova and the events coming from the keyboard (as well as driving action back to the keyboard through the iPad interface).  Useful for troubleshooting.

Alchemy mobile Synth App
http://www.camelaudio.com/AlchemyMobile.php – This great app from CamelAudio adds a great selection of synth voices to be controlled by the Clavinova.  As their site says, “Turn your iPhone/iPad into a powerful synthesizer! Alchemy Mobile includes everything from evolving soundscapes and fat basses to lush pads and pulsing arpeggios, and is available for free from the iTunes App store.”